
Appetizers
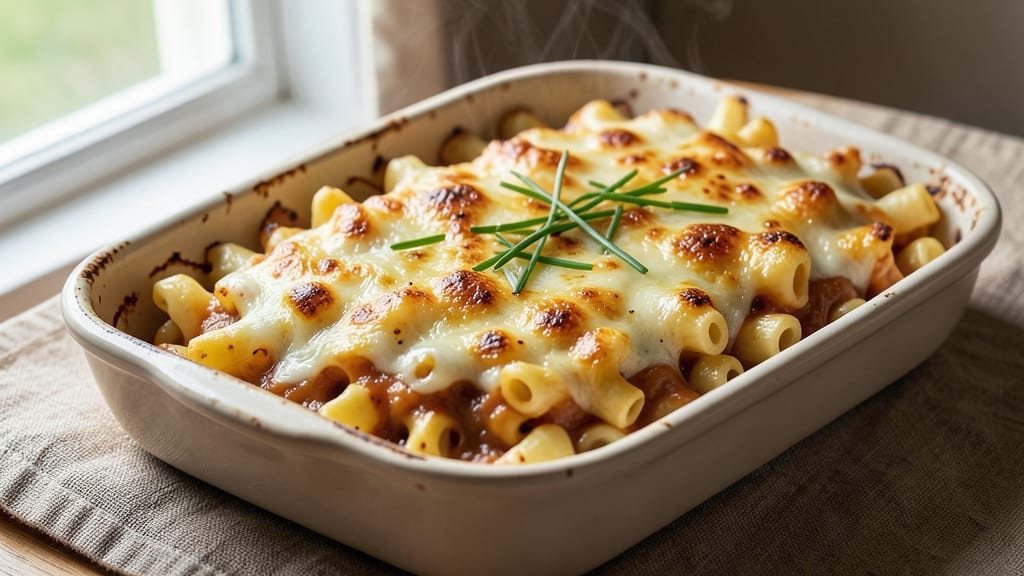
This baked garlic mac and cheese recipe delivers the perfect marriage of crispy breadcrumb topping and rivers of gooey, garlicky cheese—every bite is a revelation. The secret lies in toasting the breadcrumbs until golden and infusing the sauce with sautéed garlic for deep, aromatic flavor. I’ve perfected this technique over years of testing, ensuring the cheese stays creamy while the top achieves that coveted crunch.
What sets this recipe apart is the balance: a rich, velvety cheese sauce with just enough garlic to satisfy without overpowering, topped with crispy, buttery breadcrumbs that hold their texture even after baking.
The oven temperature and timing are critical—too high, and the breadcrumbs burn; too low, and the sauce gets watery. But nail it, and you’ll have a dish that’s restaurant-quality yet simple enough for weeknights.
The result is a crispy top that shatters slightly, revealing molten cheese beneath, while the garlic flavor permeates every forkful. This mac and cheese is hearty enough to stand alone but pairs beautifully with roasted broccoli or a simple side salad.
The aroma alone will have everyone gathering around the table—no takeout needed.
Ready in about 45 minutes, this recipe requires minimal effort but maximum reward. The key steps—sautéing the garlic, making the roux, and baking at the right temperature—ensure foolproof success. Once you try this version, you’ll never go back to boxed or basic mac and cheese again.
Ingredients for baked garlic mac and cheese
Sixteen ingredients transform into restaurant-quality mac and cheese with crispy, garlicky perfection.
| Ingredient | Amount | Notes |
|---|---|---|
| Elbow Macaroni 🍝 | 1 ½ lbs | Dry pasta, cooked al dente |
| Sharp Cheddar Cheese 🧀 | 2 cups | Shredded, sharp variety preferred |
| Monterey Jack Cheese 🧀 | 1 cup | Shredded, mild complement |
| Heavy Cream 🥛 | 1 cup | Full-fat for richness |
| Whole Milk 🥛 | 1 cup | Warmed for smooth sauce |
| Unsalted Butter 🧈 | ½ cup | Cold, cubed for roux |
| Garlic Cloves 🧄 | 6 cloves | Fresh, minced for depth |
| All-Purpose Flour 🌾 | ¼ cup | For roux thickening |
| Panko Breadcrumbs 🍞 | 1 ½ cups | Toasted for crispy topping |
| Unsalted Butter 🧈 | ¼ cup | Melted for breadcrumb binding |
| Dried Parsley 🌿 | 1 tbsp | Finely chopped for garnish |
| Kosher Salt 🧂 | 1 ½ tsp | Adjust to taste |
| Ground Black Pepper 🌶️ | ½ tsp | Freshly cracked |
| Nutmeg 🌿 | ¼ tsp | Freshly grated for warmth |
| Garlic Powder 🧄 | ½ tsp | Enhances garlic flavor |
The cheese selection is non-negotiable for that signature melt. Sharp cheddar from a specialty cheese shop—like Murray's or Tillamook—delivers the tangy punch, while Monterey Jack adds creaminess. I always grab pre-shredded Kraft brand for convenience, but freshly grated melts better. For the garlic, fresh is mandatory—minced right before sautéing to preserve those aromatic oils. If you're short on time, garlic powder at half the amount works, but the flavor won't be as complex. The panko breadcrumbs should be light and dry—Panko from Trader Joe's is my go-to, but any quality panko will do.
No sharp cheddar? Pepper Jack or Gruyère bring different but delicious profiles. Heavy cream can be swapped for half-and-half at a 1:1 ratio, though the sauce will be slightly lighter. The flour is for the roux—all-purpose works fine, but pastry flour gives a silkier texture if you're feeling fancy. For the garlic, roasted garlic paste (like Garlic Life) is a great shortcut—just use half the amount. The nutmeg is subtle but essential; if you're missing it, a pinch of cinnamon adds warmth in a pinch. Always taste the cheese sauce before baking—adjust salt and pepper to balance the flavors.
This mac and cheese reheats beautifully—just cover with foil and warm at 350°F for 15 minutes. Leftovers keep for 4-5 days in the fridge, though I rarely have any. For make-ahead prep, assemble the dish, refrigerate overnight, then bake straight from cold—add 10 extra minutes to the baking time. The breadcrumb topping stays crispy for 3 days if stored properly, though it's best eaten fresh. Double the recipe and freeze half for lazy weeknights—just thaw in the fridge overnight before reheating.
Why You'll Love This Recipe
- One-Pot Magic: I swear by this recipe—just toss the macaroni, cheese, and cream into one dish, bake, and walk away. No saucepans clogging my sink, no sticky stovetop mess.
- Garlic Bomb Flavor: That sharp cheddar and Monterey Jack combo with roasted garlic? It’s the kind of rich, tangy, umami punch that makes me reach for seconds. The heavy cream ties it all together like a creamy hug.
- Lunchbox Hero: Between us, this is my go-to for meal prep. Portion it into containers, and you’ve got a lunch that’ll make coworkers jealous—no sad soggy leftovers here.
- Budget Comfort: Sharp chedddar and elbow mac are cheap, but this tastes like a fancy dinner. I feed four people for under $10, and honestly? That’s a win I’ll take any day.
Step-by-step instructions for baked garlic mac and cheese
This method delivers that perfect balance of crispy breadcrumb topping and gooey, garlic-infused cheese filling.
Cook the Elbow Macaroni to Al Dente Perfection
Bring a large pot of water to a rolling boil and add 1.5 lbs elbow macaroni. Season the water generously with salt—it should taste like the ocean when you dip a spoon in. Cook the pasta until it's al dente, which means it should have a slight bite to it when you taste it. For elbow macaroni, this typically takes about 10-12 minutes.
Drain the pasta in a colander and immediately rinse it under cold water for 10-15 seconds to stop the cooking process. This prevents the pasta from becoming mushy when mixed with the cheese sauce later. Shake the colander gently to remove any excess water, but don't let the pasta dry out completely—it should still feel slightly damp to the touch.
Prepare the Garlic Cheese Sauce
In a large, heavy-bottomed pot, melt 0.5 cup unsalted butter over medium heat. Once the butter has melted and is foaming, add the 6 cloves minced garlic and sauté for 1-2 minutes until the garlic is fragrant but not browned. This step is crucial—it infuses the sauce with garlic flavor without burning it.
Reduce the heat to medium-low and whisk in 0.25 cup all-purpose flour to create a roux. Cook the roux for 1-2 minutes, stirring constantly, until it turns a light golden color. This helps thicken the sauce and adds a subtle richness. Next, slowly pour in 1 cup whole milk and 1 cup heavy cream, whisking continuously to prevent lumps from forming.
Bring the mixture to a gentle simmer and let it cook for 3-5 minutes until it begins to thicken. Remove the pot from heat and stir in 2 cups sharp cheddar cheese and 1 cup monterey jack cheese, along with 1.5 tsp kosher salt, 0.5 tsp ground black pepper, 0.25 tsp nutmeg, and 0.5 tsp garlic powder. Stir until the cheese is completely melted and the sauce is smooth and creamy. If the sauce is too thick, add a splash of milk to reach your desired consistency.
Combine Pasta and Sauce
Add the drained elbow macaroni to the cheese sauce and stir gently to coat each piece evenly. You want the pasta to be fully enveloped in the sauce, but avoid overmixing, which can break the pasta. Let the mixture sit for 2-3 minutes to allow the flavors to meld together. Taste and adjust the seasoning if needed—you may want to add a pinch more salt or pepper to suit your preference.
Transfer the macaroni and cheese mixture to a greased 9x13-inch baking dish. Spread it out evenly, making sure to cover the bottom and sides of the dish. This ensures even baking and a crispy topping. Smooth the surface with a spatula, creating a level top for the breadcrumb crust.
Create the Crispy Breadcrumb Topping
In a small bowl, combine 1.5 cups panko breadcrumbs with 0.25 cup melted unsalted butter and 1 tbsp dried parsley. Mix until the breadcrumbs are evenly coated and slightly clump together. This mixture is what will create the crispy, golden-brown topping that everyone loves.
Sprinkle the breadcrumb mixture evenly over the top of the macaroni and cheese, pressing down gently to ensure it sticks. For extra crispiness, I like to use the back of a spoon to press the breadcrumbs into the cheese, creating a compact layer. This step is what transforms a simple mac and cheese into a restaurant-worthy dish with that perfect textural contrast.
Bake Until Bubbly and Golden
Preheat your oven to 375°F and bake the macaroni and cheese for 20-25 minutes until the top is golden brown and the edges are bubbling. The cheese should be hot and gooey, with the breadcrumb topping looking crispy and slightly caramelized. If the top isn't browning enough, you can broil it for 1-2 minutes at the end, but keep a close eye on it to avoid burning.
Remove the baking dish from the oven and let it rest for 5-10 minutes before serving. This resting time allows the cheese to set slightly, making it easier to slice and serve. The dish should be bubbling with melted cheese and topped with a crispy, golden-brown crust. Serve immediately while it's hot and gooey, and enjoy every rich, cheesy, garlic-infused bite!
Pro Tips For Making Baked Garlic Mac And Cheese
- USE PASTA WATER WISELY: After draining your elbow macaroni, don’t rinse it—toss it back into the pot with a splash of that starchy pasta water. The starch acts like glue for the cheese sauce, making it creamier and less likely to separate when baked. (Yes, even if it looks like you’re wasting water, you’re not.)
- GRATE CHEESE FRESH: Pre-shredded cheese has anti-caking agents that make baked mac and cheese grainy and dry. Grate sharp cheddar and Monterey Jack yourself—use a box grater or food processor—and mix them right into the sauce while it’s still hot. The cheese melts smoother, and the flavor’s richer.
- BAKE UNTIL GOLDEN: I used to pull my mac out when the top looked "done," only to find it still pale and soupy underneath. Bake it until the edges are deep golden brown—about 10-15 minutes past when you think it’s ready. A broiler for the last 2 minutes gives that perfect caramelized crust without burning.
- SAUTÉ GARLIC LOW: Garlic burns faster than you’d think, and bitter garlic ruins the whole dish. Cook minced garlic in the heavy cream and milk on medium-low heat until it’s just fragrant—not golden. If you’re impatient, pull the pan off the heat and let the residual heat finish it. (I’ve learned this the hard way.)
Pro cooking tips for great baked garlic mac and cheese
Garlic Sauté Mastery
The garlic is where the magic happens, so don’t rush this step! I swear by using a heavy-bottomed pot (like All-Clad) to prevent burning. Sauté the 6 cloves minced garlic in 0.5 cup melted butter over medium heat for exactly 1-2 minutes—just until fragrant.
Going beyond this risks bitterness. For extra depth, I sometimes add a pinch of red pepper flakes to the garlic while sautéing. 🧄
Roux Perfection
Your roux is the foundation of that velvety sauce, so don’t skip the whisking! Whisk the 0.25 cup flour into the melted butter until it forms a smooth paste with no lumps.
Cook it for 1-2 minutes until it turns a light golden color—this is your cue to slowly pour in the liquids. If you rush this, you’ll end up with a grainy sauce. Pro tip: Use a wire whisk for better control. ✨
Cheese Melting Secrets
When adding the cheese, remove the pot from heat first—this prevents the cheese from seizing up. Stir constantly until fully melted, then let the sauce sit off heat for 1-2 minutes to thicken naturally.
If it’s too thick, add 1 tbsp warm milk at a time. I’ve found that Murray’s sharp cheddar melts the smoothest, but pre-shredded Kraft brand works in a pinch. 🧀
Baking Temperature Precision
That 375°F oven temp is non-negotiable for even baking. Too high, and your breadcrumbs burn before the cheese sets; too low, and the sauce gets watery. For extra insurance, place a thermometer probe in the center of the dish—it should hit 165°F before removing.
If the top isn’t golden enough after 20-25 minutes, broil for 1 minute max, watching like a hawk. 🌡️
Resting for Success
Never skip the 5-10 minute rest after baking! This lets the cheese firm up slightly, making it easier to slice without losing the crispy topping. I like to tent the dish loosely with foil during this time to keep it warm.
Serving immediately is tempting, but patience here makes all the difference. 💫
Breadcrumb Crispiness Hacks
For that perfect crunch, toast your panko breadcrumbs in a dry pan over medium heat for 2-3 minutes** before mixing with butter. This removes excess moisture, ensuring a crispier topping.
Press them down firmly with the back of a spoon—this creates a compact layer that won’t slide off during baking. 🍞
Nutrition facts
Frequently asked questions
Why does my baked mac and cheese turn out watery?
The most common cause is overcooking the pasta or not draining it well. Always rinse pasta with cold water for 10-15 seconds after draining, then shake gently to remove excess moisture. Also, ensure your cheese sauce is properly thickened by cooking the roux to a light golden color and letting it simmer for 3-5 minutes before adding cheese. If your sauce still looks thin, reduce it on low heat for an extra 2-3 minutes before baking.
Can I make this ahead of time?
Assemble the dish in your baking dish, cover tightly with foil, and refrigerate for up to 24 hours. When ready to bake, remove from the fridge and bake at 375°F for 30-35 minutes (the extra time accounts for the cold start). For make-ahead baking, you can also freeze the assembled dish (unbaked) for up to 2 months. Thaw overnight in the fridge, then bake as directed, adding 5-10 extra minutes to the baking time.
How do I get the breadcrumb topping extra crispy?
Toast your panko breadcrumbs in a dry skillet over medium heat for 2-3 minutes before mixing with butter. This removes excess moisture. Then, press them firmly into the cheese with the back of a spoon before baking. For even more crunch, broil for 1-2 minutes at the very end (watch closely to avoid burning). Using butter-flavored oil spray on the dish before adding the breadcrumbs also helps create a crispier barrier.
What's the best cheese substitute if I don't have sharp cheddar?
For a similar tangy flavor, try Pepper Jack or Gruyère. If you prefer milder cheeses, use Monterey Jack with a splash of lemon juice (1 tsp) to add brightness. For extra richness, add ½ cup cream cheese to the sauce. Avoid pre-shredded cheese with anti-caking agents—it won't melt as smoothly. Freshly grating your own cheese makes all the difference in texture and flavor.
Can I make this in a smaller baking dish?
Yes, but adjust the baking time. For a 9x9-inch dish, reduce the recipe by about 33% (use 1 lb pasta, 1 cup each cheese, etc.) and bake for 15-20 minutes. For a 7x11-inch dish, use about 75% of the recipe and bake for 20-25 minutes. The key is maintaining the same depth of 1.5-2 inches for even baking. Always check doneness with a thermometer—it should reach 165°F in the center.