
Snacks
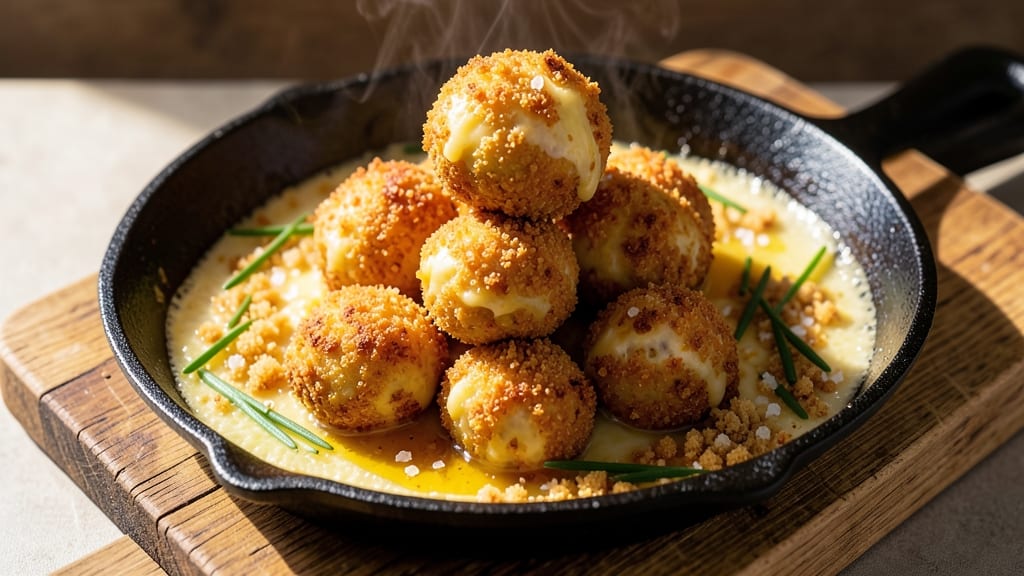
American cheese balls recipe delivers the ultimate snack experience—crispy, golden breadcrumb shells filled with gooey, pull-apart cheese that melts in your mouth. 🔥 The secret lies in chilling the dough properly and baking until the edges are perfectly crisp while the center stays warm and stretchy. This recipe transforms a simple mix of cheese, cream cheese, and breadcrumbs into something restaurant-worthy that disappears faster than you can say "extra cheese."
The beauty of these cheese balls is their versatility—they work as an appetizer, game-day snack, or even a comforting side dish. The dough comes together in minutes with just a handful of ingredients, and the baking process ensures that crispy exterior we all crave.
Whether you're feeding a crowd or craving a salty, cheesy bite, this recipe delivers every time without requiring fancy techniques.
What makes these cheese balls truly special is that balance between texture and flavor: the outside stays crispy while the inside remains soft and cheesy, creating the perfect contrast with every bite.
The breadcrumb shell adds a satisfying crunch that pairs beautifully with warm marinara sauce or cool ranch dressing for dipping. It's the kind of snack that brings people together, whether you're hosting a party or just looking for something to satisfy that late-night craving.
Ready to make these from scratch? The process is straightforward, and I'll walk you through every step—from mixing the dough to achieving that perfect crispy shell. Plus, I'll share my favorite variations, like adding jalapeños for a kick or herbs for extra depth. Let's get started!
Ingredients for american cheese balls
Crispy shells, gooey centers—just these 11 ingredients transform into the ultimate party snack!
| Ingredient | Amount | Notes |
|---|---|---|
| Shredded American Cheese 🧀 | 2 cups | Freshly shredded, not pre-shredded |
| Cream Cheese 🧈 | 8 oz | Full-fat for best texture |
| Panko Breadcrumbs 🍞 | 2 cups | Light and crispy preferred |
| All-Purpose Flour 🌾 | ¼ cup | For extra binding |
| Large Eggs 🥚 | 2 whole | Room temperature for best mix |
| Butter 🧈 | 2 tbsp | Melted, unsalted preferred |
| Garlic Powder 🧄 | 1 tsp | For subtle flavor boost |
| Onion Powder 🧅 | 1 tsp | Adds depth to flavor |
| Ground Black Pepper 🌶️ | ½ tsp | Freshly cracked preferred |
| Kosher Salt 🧂 | ½ tsp | Adjust to taste |
| Vegetable Oil 🫒 | 2 tbsp | For greasing baking sheet |
The cheese is everything here. Freshly shredded American cheese (the good stuff, not the pre-shredded kind) gives that perfect melt. Trader Joe's has the best pre-shredded, but if you're buying a block, shred it yourself—it makes all the difference. Cream cheese needs to be full-fat for that rich, pull-apart texture. Philadelphia brand works every time, but I've also had great results with Kirkland Signature when it's on sale. Panko is non-negotiable—it's what gives those cheese balls that perfect crispy shell. Grab a bag at Walmart or Target for the best price, or splurge on Japanese panko if you want extra crunch.
No panko? Regular breadcrumbs plus 1 tbsp cornstarch works in a pinch. Short on American cheese? Mozzarella and cheddar blend gives similar stretchiness. The dough gets sticky—don't stress about perfect measurements. Wet hands make rolling easier, and if it cracks, just press it back together. For extra flavor, toss in 1/4 cup grated Parmesan with the breadcrumbs. Want it spicy? Add 1/4 tsp cayenne pepper to the dough. The egg needs to be room temp, so take it out 10 minutes before mixing. And trust me on the melted butter—it keeps everything from sticking together.
These keep for 3 days in the fridge, but honestly? They taste better fresh. Reheat in a 350°F oven for 5-7 minutes to revive that crispy shell. Freeze for up to 3 months by placing them on a tray first, then transferring to a bag. Portion into single servings so you can grab and go. Pro tip: Serve with warm marinara or ranch—the contrast is next-level. Leftovers? Toss them in a pan with a little butter and garlic powder for a quick breakfast hash. Game changer.
Why You'll Love This Recipe
- No-Fuss Mixing: I swear by the 5-minute prep—just toss shredded American cheese with softened cream cheese, crack an egg, and fold in panko. No measuring cups, no food processor, just hands-on simplicity that still delivers.
- Crispy-Creamy Magic: That first bite? The outside gets perfectly golden from the panko crust while the inside stays melty and tangy from the cream cheese. It’s the kind of contrast that makes you grab another one without thinking.
- Game for Any Occasion: I keep these in my freezer for game day, potlucks, or even lazy Sunday brunches. They’re hearty enough for a snack but feel fancy enough to serve when company drops by—no one will guess how easy they were.
- Budget-Friendly Stash: A single batch costs me pennies and stretches for days. Freeze extras for when I’m too tired to cook, or toss a few in a lunchbox—kids (and adults) always go back for seconds. Cheap, filling, and zero guilt.
Step-by-step instructions for American cheese balls
Here's how to make melt-in-your-mouth cheese balls with perfect crispy shells and gooey centers.
👨🍳 Step 1: Mix the Cheese Filling
In a large mixing bowl, combine the 2 cups shredded American cheese and 8 oz cream cheese. I like to use my hands for this part—it helps break up any clumps in the American cheese. Microwave the mixture in 30-second bursts, stirring between each, until the cream cheese is completely melted and everything forms a smooth, creamy blend. It should be warm to the touch but not hot.
This step is crucial for texture. If the cheese mixture is too cool, the breadcrumbs won't stick properly, and you'll end up with crumbly balls instead of cohesive ones. Once melted, stir in 1 tsp garlic powder, 1 tsp onion powder, ½ tsp ground black pepper, and ½ tsp kosher salt until evenly distributed. Let the mixture cool slightly while you prepare the breadcrumb coating.
🍳 Step 2: Prepare the Breadcrumb Coating
In a separate bowl, whisk together the 2 cups panko breadcrumbs, ¼ cup all-purpose flour, and 2 tbsp melted butter until the panko is evenly coated and looks fluffy. The butter helps bind the breadcrumbs and adds richness to the final texture. I like to use my fingers to break up any large panko clusters—this ensures an even coating on each cheese ball.
Crack the 2 whole large eggs into another bowl and whisk vigorously until the whites and yolks are fully combined. The eggs will act as a glue between the cheese filling and the breadcrumb coating. Keep all your bowls ready—this is where the magic happens!
🥘 Step 3: Assemble and Shape the Cheese Balls
Using a cookie scoop or tablespoon, portion out 1-tablespoon portions of the cheese mixture. Roll each portion into a ball between your palms, pressing gently to compact it. The cheese should hold its shape but still be pliable—if it's too sticky, chill it in the fridge for 5 minutes to firm up slightly.
Here's the fun part: dip each cheese ball into the beaten eggs, letting any excess drip off, then roll it thoroughly in the breadcrumb mixture. Press the breadcrumbs gently to adhere—this creates that signature crispy shell. Place the coated balls on a parchment-lined baking sheet, spacing them about 1 inch apart. They'll expand slightly as they bake.
🔥 Step 4: Bake to Golden Perfection
Preheat your oven to 375°F while you work. Once hot, bake the cheese balls for 18-20 minutes until they're deep golden brown and the edges look crispy. The centers should still be soft and gooey when you cut into one—this is what makes them irresistible!
I know it's tempting to check early, but resist! The breadcrumbs need time to fully crisp up. If your oven runs hot, start checking at the 16-minute mark. For extra crispiness, broil for 1-2 minutes at the end, watching closely to avoid burning. Let them cool on the baking sheet for 5 minutes before serving—this helps set the coating.
🍽️ Step 5: Serve Warm and Enjoy!
Transfer the cheese balls to a serving platter and serve them warm. The contrast between the crispy, golden exterior and the molten, cheesy interior is what makes these so addictive. Pair them with marinara sauce for dipping or serve as a snack with chips or crackers. They're best enjoyed within 30 minutes of baking while still warm and gooey!
Pro tip: If you want to make ahead, assemble the balls and refrigerate them (unbaked) for up to 24 hours. Bake straight from the fridge, adding 2-3 extra minutes to the baking time. The flavor only gets better as they sit!
Pro Tips For Making American Cheese Balls
- Microwave Cheese First: I learned this the hard way—skipping this step means cold cheese balls that won’t hold shape. Pulse the shredded American cheese in 30-second bursts until just softened (not melted), then mix with cream cheese. The texture stays consistent, and the balls won’t fall apart when frying.
- Use Room-Temp Eggs: Cold eggs make the coating clump like a sad science experiment. Crack them into a bowl 10 minutes before dredging and let them sit—no need to fully blend, just let them warm. The panko will stick better, and the crust won’t slide off mid-fry.
- Don’t Overmix the Dredge: Once you coat the cheese balls in flour, panko, and egg, stop. Stirring too much turns the panko into mush and drowns the crust in excess egg. Just press gently—enough to adhere, not enough to turn it into a gluey mess.
- Fry in Batches of 3: Crowding the pan drops the oil temp faster than a New York winter, leading to greasy, unevenly cooked balls. Three at a time gives them space to crisp without steaming. Use a slotted spoon to avoid splatter—trust me, your kitchen will thank you.
Wine and beer pairings for this recipe
Crispy Shells Need Crispy Pairings
The rich, salty, and slightly sweet flavor of American cheese balls pairs beautifully with light, refreshing wines that cut through the richness. A crisp Chardonnay (like La Crema Sonoma Coast) with its bright citrus notes and subtle vanilla from oak aging is my go-to choice.
The acidity balances the cheese's creaminess while the fruitiness complements the buttery breadcrumb crust. 🍷
Beer for Every Occasion
For a casual game-day spread, reach for a light lager—Miller Lite or Coors Light work perfectly. Their clean, crisp profiles won't overpower the cheese balls' flavor.
If you're feeling adventurous, try a wheat beer like Blue Moon—the citrus and spice notes add a fun contrast to the salty snack. For a heartier option, a honey wheat ale (like Allagash White) enhances the caramelized breadcrumb texture.
Sweet Contrast Wins
Don't underestimate the power of a sweet pairing! A dry Riesling (such as Dr. Loosen Blue Slate) with its crisp acidity and honeyed finish creates a delightful contrast. The slight sweetness echoes the caramelized notes in the breadcrumbs while keeping the palate refreshed.
For a non-alcoholic option, sparkling apple cider (like Martinelli's) adds a festive touch that kids and adults alike will love.
Spicy Cheese Calls for Bold Brews
If you add jalapeños or cayenne to your cheese balls, opt for a malty amber ale (like Fat Tire) to tame the heat. The caramel and biscuit notes in the beer balance the spice beautifully.
A dark lager (such as Negra Modelo) also works well—its roasted malt flavors complement the smoky, spicy edge while keeping the cheese's richness in check. 🍺
Dessert Wine for Late-Night Cravings
Save a demi-sec Champagne (like Moët & Chandon Impérial) for when you're enjoying these as a late-night snack. The bubbles and subtle sweetness elevate the experience, making it feel like a special treat.
For a budget-friendly option, a sparkling rosé** (such as Whispering Angel) offers the same celebratory feel without breaking the bank.
Nutrition facts
Frequently asked questions
Why do my cheese balls turn out crumbly instead of gooey?
The cheese mixture needs to be warm but not hot when mixing with breadcrumbs. If it's too cool, the breadcrumbs won't bind properly. Microwave the cheese in 30-second bursts until melted, then let it cool slightly before adding breadcrumbs. Also, avoid overmixing—the dough should hold together when rolled but still be pliable.
Can I make these cheese balls ahead of time?
Assemble the unbaked balls and refrigerate them for up to 24 hours. Bake straight from the fridge, adding 2-3 extra minutes to the 18-20 minute baking time. For longer storage, freeze them for up to 3 months—place on a tray first, then transfer to a bag for easy reheating.
What's the best way to make them extra crispy?
Use Japanese panko for maximum crunch, and press the breadcrumbs firmly when coating. For extra crispiness, broil for 1-2 minutes at the end of baking, watching closely to avoid burning. Let them cool on the baking sheet for 5 minutes before serving—this helps set the coating for that satisfying crunch.
Can I substitute regular breadcrumbs for panko?
Yes, but add 1 tablespoon cornstarch to help create crispiness. Regular breadcrumbs won't be as light or crunchy, but they'll still work in a pinch. For best results, use light, dry breadcrumbs (like those from a baguette) rather than wet or seasoned varieties.
What's the secret to keeping the centers gooey?
Don't overbake! The cheese balls are done when they're deep golden brown—the centers should still be soft and stretchy. Bake for 18-20 minutes at 375°F, and resist the urge to check early. If they cool too much, reheat in a 350°F oven for 5-7 minutes to restore that perfect texture.