
Appetizers
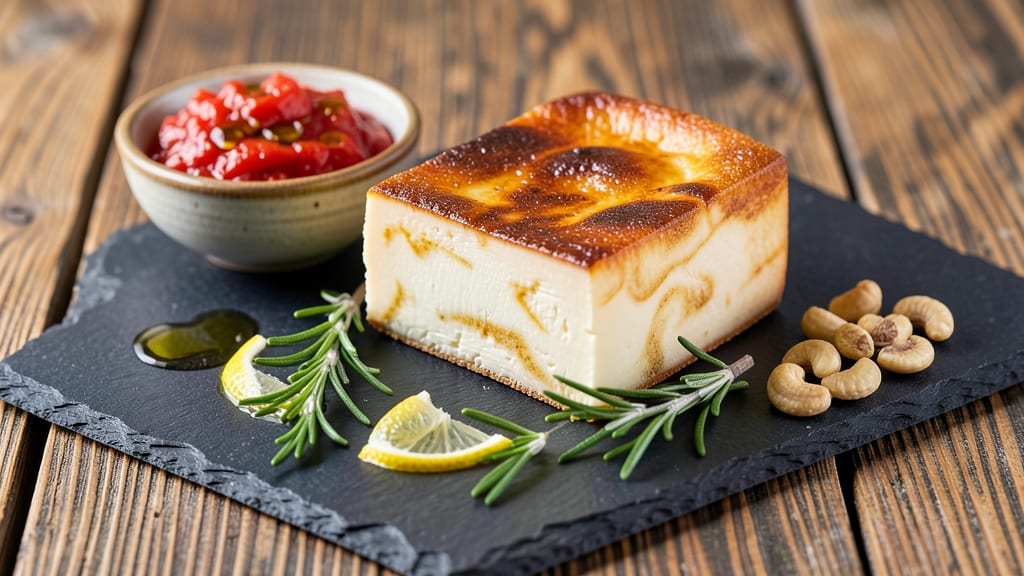
This artisan vegan cheese recipe delivers the rich, nutty depth of traditional cheese without dairy—crafted entirely in one bowl. 💛 The secret lies in blending soaked cashews with nutritional yeast, lemon juice, and a touch of miso for umami complexity, creating a spreadable cheese that melts beautifully.
Perfect for those seeking plant-based alternatives with restaurant-quality texture.
The process is surprisingly straightforward: soak cashews to soften, then blend them with simple pantry staples until silky smooth. No fermentation required here—just a few minutes of blending transforms humble ingredients into a versatile cheese with a tangy, slightly sweet profile.
Ideal for toasting on crackers, melting over pasta, or using as a pizza topping.
What makes this recipe stand out is its adaptability—adjust the lemon for brightness or add smoked paprika for depth. The result is a cheese that holds its shape when sliced but softens perfectly when heated, mimicking the behavior of dairy-based cheeses.
Store it in an airtight container for up to two weeks, or freeze for longer shelf life.
Whether you're vegan, lactose intolerant, or simply curious about plant-based cooking, this recipe proves you don’t need dairy to enjoy artisanal cheese. Let’s create something truly exceptional in your kitchen.
Ingredients for artisan vegan cheese
Simple plant-based ingredients transform into restaurant-quality artisan vegan cheese in one bowl.
| Ingredient | Amount | Notes |
|---|---|---|
| Raw Cashews 🥜 | 1 ½ cups | Unsalted, soaked for 4 hours |
| Nutritional Yeast 🍞 | ½ cup | High-protein, unsulfured |
| White Miso Paste 🍜 | 2 tbsp | For umami depth |
| Lemon Juice 🍋 | 2 tbsp | Freshly squeezed |
| Extra-Virgin Olive Oil 🫒 | ¼ cup | For richness |
| Filtered Water 💧 | ¼ cup | Room temperature |
| Smoked Paprika 🌶️ | 1 tsp | For depth (optional) |
| Sea Salt 🧂 | ½ tsp | Diamond Crystal preferred |
| Garlic Powder 🧄 | ½ tsp | Freshly ground preferred |
| Ground Black Pepper 🌶️ | ¼ tsp | Freshly cracked |
| Tapioca Starch 🌾 | 1 tbsp | For texture binding |
The raw cashews are the foundation here—unsalted and soaked for 4 hours to achieve that creamy, melt-in-your-mouth texture. Trader Joe’s or bulk bins at natural grocery stores offer the best quality at reasonable prices. Nutritional yeast is non-negotiable for that authentic cheesy flavor; Bragg or Bob’s Red Mill brands are my go-to. The white miso adds umami complexity—look for organic varieties at Asian markets or well-stocked supermarkets like Whole Foods. Fresh lemon juice brightens the flavor profile, so avoid bottled versions unless it's freshly squeezed and pasteurized.
No miso? Soy sauce or white wine vinegar can mimic the umami, though the texture may vary slightly. Running low on cashews? Macadamia nuts or almonds work in a pinch, but adjust the soaking time to 6 hours for optimal softness. The tapioca starch is key for that spreadable consistency—don’t skip it if you want a cheese that holds its shape when sliced. For extra richness, avocado oil can replace olive oil, though it has a slightly different flavor profile. The smoked paprika is optional but adds a subtle depth that mimics aged cheddar—Penzeys brand is excellent for this purpose.
This cheese keeps beautifully in an airtight container for up to two weeks in the fridge. For longer storage, freeze in portion-sized balls—thaw overnight in the fridge before using. The texture changes slightly after freezing, becoming more spreadable but still functional for melting or slicing. For best results, let the cheese sit at room temperature for 15-20 minutes before serving to achieve that creamy, artisan quality. Portion into small jars for easy grab-and-go use on crackers or toast.
Why You'll Love This Recipe
- Five-Ingredient Magic: I swear by this combo—soak the cashews overnight (or pulse them dry if you’re impatient), then blend with miso, lemon, and yeast. That’s it. No fancy equipment, no stress.
- Umami Bomb: The miso paste and nutritional yeast team up for a savory depth that’ll fool even cheese skeptics. Honestly, the first time I tried it on toast, I forgot it wasn’t dairy.
- Cheese for Everything: Spread it on crackers, melt it into pasta, or crumble it over salads. (Yes, even on pizza—trust me.) The cashews give it a creamy pull, while the lemon keeps it bright.
- No-Waste Luxury: A batch lasts me a week, and the leftovers? Even better the next day. Plus, cashews are cheaper than store-bought vegan cheese, and you’ll use every bit.
Step-by-step instructions for artisan vegan cheese
Transform simple ingredients into rich, meltable vegan cheese with this precise, one-bowl method.
👨🍳 Step 1: Soak and Prepare the Cashews
Begin by soaking the 1.5 cups raw cashews in filtered water for at least 4 hours (or overnight) to soften them completely. This step is non-negotiable—proper hydration ensures a creamy texture rather than a gritty one. Drain and rinse them thoroughly before using.
While the cashews soak, gather all remaining ingredients. I like to measure everything out first to avoid mid-process scrambling. The cashews should feel tender when pressed between fingers after draining—this is your visual cue they're ready for blending.
🍳 Step 2: Blend Wet Ingredients to Smooth Perfection
In a high-speed blender, combine the drained cashews, 2 tbsp white miso paste, 2 tbsp lemon juice, 0.25 cup extra-virgin olive oil, and 0.25 cup filtered water. Blend on high for 2-3 minutes until completely smooth with no visible texture. You're aiming for a consistency similar to heavy cream.
Here's the thing—don't rush this step. The miso paste needs to fully emulsify, and the cashews must break down completely. If you see any grit, blend another 30 seconds until silky. The lemon juice will brighten the flavor while the olive oil adds richness that mimics traditional cheese fat.
🥘 Step 3: Incorporate Dry Seasonings and Starch
With the blender running on low speed, gradually add the 0.5 cup nutritional yeast, 1 tsp smoked paprika, 0.5 tsp sea salt, 0.5 tsp garlic powder, and 0.25 tsp ground black pepper. Let the mixture blend for 1 minute to ensure even distribution of these flavor components.
Finally, add the 1 tbsp tapioca starch through the feed tube while blending on high for 30 seconds. The starch acts as a natural thickener that will give your cheese its meltable quality. You'll notice the mixture becomes slightly thicker and more cohesive—this is exactly what we want.
⏰ Step 4: Process for Texture Development
Transfer the blended mixture to a food processor fitted with the metal blade attachment. Process for 3-5 minutes until the mixture becomes completely smooth and begins to develop body. You'll see it transform from a loose paste to a thick, almost dough-like consistency that clings to the sides.
Stop processing when you can form a ball that holds together when pressed between fingers. This texture indicates proper protein development—similar to how dairy cheese forms when heated. If it's still too soft, process another 30 seconds. The goal is a firm yet pliable cheese that can be shaped and melted.
🍽️ Step 5: Shape and Age for Optimal Flavor
Transfer the cheese to a piece of parchment paper and shape it into a log or block using your hands. Wrap it tightly in the parchment and refrigerate for at least 2 hours (or up to 24 hours) to firm up. This aging process allows the flavors to meld and the texture to set properly.
For best results, let the cheese come to room temperature before using. It should hold its shape when sliced but still be pliable enough to melt beautifully. This vegan cheese will keep in the refrigerator for up to 1 week when properly wrapped, maintaining its rich, nutty depth and meltable quality.
Pro Tips For Making Artisan Vegan Cheese
- SOAK CASHEWS OVERNIGHT: I learned this the hard way—rushing the soak with hot water just makes them gummy. Use cold water and let them sit 10+ hours (yes, even overnight). The texture becomes buttery and smooth, not chalky, and the flavor develops deeper. Trust me, your cheese won’t taste like wet sand if you do this.
- BLEND IN STAGES: Start with just the soaked cashews and nutritional yeast—blend until completely smooth, then add miso, lemon, and oil slowly. Dumping everything in at once creates a lumpy mess. The miso paste is potent; taste as you go, especially if you’re using a strong white miso. Stop when it’s creamy, not pasty.
- STOP WHEN IT’S STRETCHY: Over-blending turns your cheese into glue. You want it to hold shape when scooped but still be pliable—like soft mozzarella. If it’s too thick, add a splash of warm water (not cold) while blending. If it’s too thin, chill it 10 minutes and re-blend. The goal is meltable, not runny.
- USE MISO PASTE, NOT POWDER: Miso paste has body and umami that powder can’t match. If you’re out of paste, dissolve miso powder in warm water first—it thickens and mimics the texture better. Skip this shortcut, and your cheese will taste flat, like a sad vegan cracker. Worth the extra step.
Pro cooking tips for perfect results
Blender Mastery
Your high-speed blender is the secret weapon here—Ninja or Vitamix models both work beautifully. The key is blending the wet ingredients for at least 2-3 minutes until completely smooth with no visible texture. I’ve ruined batches by rushing this step, so don’t skip it!
If your blender struggles with the cashews, add 1-2 tablespoons of water and blend another 30 seconds. The goal is a consistency similar to heavy cream—this ensures your cheese will be silky, not gritty. 💛
Starch Magic
The tapioca starch is non-negotiable for that meltable, spreadable texture. When added through the feed tube while blending on high, it acts like a natural thickener, giving your cheese structure without altering flavor.
If you’re out of tapioca starch, arrowroot powder works in a pinch, though the texture may be slightly less cohesive. For a firmer cheese, add ½ teaspoon more starch and blend for an extra 15 seconds.
Food Processor Precision
After blending, transfer the mixture to a food processor with a metal blade—plastic blades won’t cut it here. Process for 3-5 minutes until the mixture clings to the sides and forms a dough-like consistency. This step develops the protein structure, mimicking the behavior of dairy cheese.
If the mixture is too soft, chill it for 10 minutes before processing again. The texture should hold together when pressed between fingers—this is your cue it’s ready for shaping. ✨
Aging Like a Pro
Refrigerating the shaped cheese for at least 2 hours (or up to 24 hours) is where the magic happens. This aging process allows the flavors to meld and the texture to firm up properly.
For a firmer cheese, wrap it tightly in plastic wrap instead of parchment and refrigerate for the full 24 hours.
If you’re in a hurry, place the wrapped cheese in the freezer for 30 minutes to speed up the process—just let it sit at room temperature for 10 minutes before using.
Texture Troubleshooting
If your cheese turns out too soft, it likely needs more starch or longer processing. For a firmer result, add ½ teaspoon tapioca starch and blend again for 1 minute. Too crumbly? Your blend wasn’t smooth enough—re-blend the wet ingredients until completely silky.
For a creamier texture, add 1 tablespoon of filtered water and process for another 30 seconds. The key is patience—each batch is a learning experience! 💡
Equipment Upgrades
While this recipe works with basic tools, a food processor with a metal blade is a game-changer for texture development. For blending, a high-speed blender (like a Vitamix) ensures a smoother consistency, but a Ninja or KitchenAid will work too.
If you’re serious about vegan cheese-making, invest in a mandoline slicer for perfect, even slices. A small glass jar with a lid is perfect for storing and portioning your cheese—just leave ½ inch of headspace to prevent spoilage. 🌟
Nutrition facts
Frequently asked questions
Can I make this vegan cheese without a food processor?
You can try, but results may vary. A high-powered blender is essential for smooth texture, but if you lack a food processor, blend the mixture until completely smooth, then transfer to a bowl and use a rubber spatula to work it vigorously for 5-7 minutes until it develops body. The texture won't be as refined, but it'll still be edible and spreadable. For firmer results, chill the mixture in the fridge for 30 minutes before shaping.
How do I get my vegan cheese to melt like dairy cheese?
The tapioca starch is key for meltability! When heating, use low heat and stir constantly to prevent burning. For best results, microwave the cheese on 50% power for 20-30 seconds, stirring every 5 seconds until fully melted. Avoid high heat—it can make the cheese grainy. Adding 1 tsp of white miso paste to the recipe also enhances meltability by improving protein structure.
What can I do with leftover vegan cheese?
This versatile cheese works in countless ways! Use it as a pizza topping, melted on pasta, or sliced for sandwiches. For extra creativity, try making vegan grilled cheese by spreading it on toasted bread with tomato sauce, or crumble it over vegan mac and cheese. Store leftovers in an airtight container for up to 1 week, or freeze in 1-inch balls for up to 3 months—just thaw in the fridge overnight.
Why does my vegan cheese taste bitter?
Bitterness usually comes from over-blending or using old ingredients. To fix it, reduce blending time to 2 minutes and ensure your cashews are fresh (no rancid smell). Add ½ tsp more lemon juice or 1 tsp maple syrup to balance flavors. Nutritional yeast can also contribute—try a different brand like Bragg or reduce it to ¼ cup. Always use filtered water and fresh spices to avoid off-flavors.
Can I make this cheese with almonds instead of cashews?
Yes, but with adjustments! Almonds need 6 hours of soaking (or overnight) and may yield a slightly drier texture. Use 1.75 cups almonds and add 1 extra tbsp olive oil to compensate. Blend the wet ingredients for 3-4 minutes to ensure complete smoothness. The flavor will be nuttier but less rich—cashews provide better fat content for that creamy, cheese-like quality.