
Main Courses
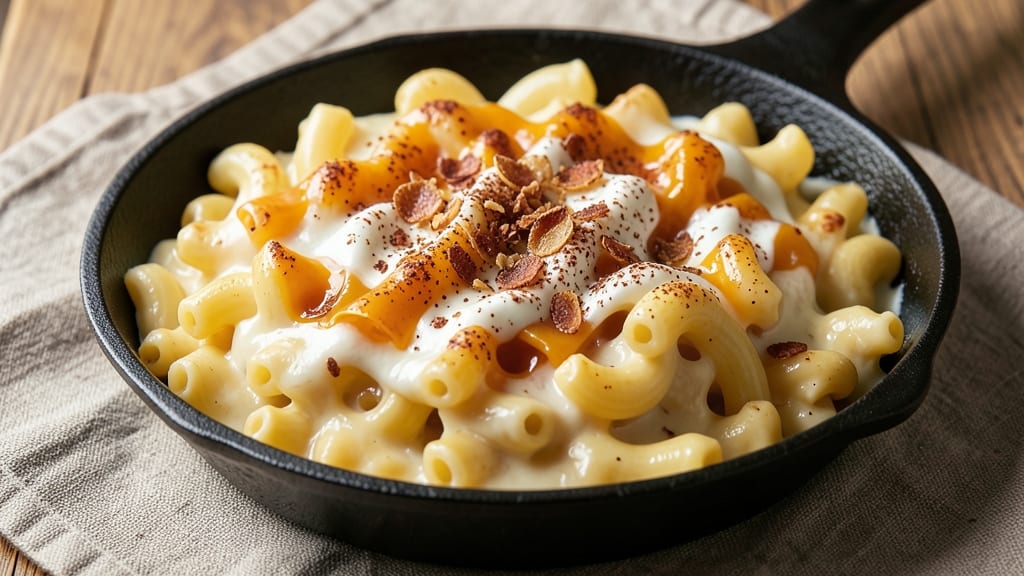
This American style mac and cheese recipe delivers the perfect balance of crispy, golden breadcrumb topping and ultra-creamy cheese sauce that melts in your mouth. The secret lies in a properly made roux and carefully layered ingredients that transform ordinary macaroni into a showstopping comfort dish.
I've perfected this technique over years of testing, ensuring every bite achieves that ideal texture contrast—crunchy crown over velvety filling.
The foundation starts with a rich, velvety cheese sauce made from sharp cheddar, Gruyère, and cream cheese, all combined with a smooth butter-flour roux. This sauce clings beautifully to the pasta, creating that signature creamy consistency without ever becoming greasy.
The key technique is baking the mac and cheese until the breadcrumb topping turns golden brown, while the cheese sauce remains perfectly creamy underneath.
What makes this version truly special is the crispy breadcrumb crown that forms on top—a textural contrast that elevates ordinary mac and cheese to restaurant-quality status. The breadcrumbs toast to a perfect golden hue while staying light and crunchy, providing that satisfying bite that balances the rich, cheesy filling.
This is the kind of mac and cheese that disappears faster than you can say "comfort food."
Whether you're serving it as a main course for a family dinner or as a crowd-pleasing side dish, this recipe delivers consistent results every time. The instructions walk you through each step to ensure that crispy, creamy perfection, from preparing the pasta to achieving that golden, crunchy topping.
Let's get started on creating this ultimate American classic.
Ingredients for american style mac and cheese
Here's what transforms ordinary pasta into restaurant-quality mac and cheese perfection.
| Ingredient | Amount | Notes |
|---|---|---|
| Elbow Macaroni 🍝 | 1 ½ lbs | Medium or extra-large size preferred |
| Unsalted Butter 🧈 | ¾ cup | Cold, cubed for roux |
| All-Purpose Flour 🌾 | ½ cup | White or whole wheat blend |
| Sharp Cheddar Cheese 🧀 | 2 cups | Shredded, block preferred |
| Gruyère Cheese 🧀 | 1 cup | Shredded, aged 12+ months |
| Cream Cheese 🧈 | 8 oz | Full-fat, room temperature |
| Whole Milk 🥛 | 1 ½ cups | Warmed for smooth sauce |
| Panko Breadcrumbs 🍞 | 1 ½ cups | Japanese style for extra crunch |
| Parmesan Cheese 🧀 | ½ cup | Freshly grated, fine |
| Garlic Powder 🧄 | 1 tsp | Freshly ground preferred |
| Dried Mustard 🌶️ | ½ tsp | For subtle tang |
| Salt 🧂 | 1 ½ tsp | Diamond Crystal preferred |
| Black Pepper 🌶️ | ½ tsp | Freshly cracked |
| Extra-Virgin Olive Oil 🫒 | 2 tbsp | For greasing baking dish |
The cheese trio makes all the difference. Sharp cheddar brings that classic tang, while Gruyère adds nutty depth—don't skimp on the aged variety. Cream cheese is non-negotiable for that signature velvety texture. I always grab mine from Whole Foods or Trader Joe's where they keep it cold. For the breadcrumbs, Japanese panko is the secret weapon—it stays crispy even after baking. The macaroni size matters too: medium or extra-large holds the sauce better than those tiny noodles. Pro tip: cook the pasta just slightly under al dente—it'll finish cooking in the oven.
No sharp cheddar? Pepper Jack at half the amount works in a pinch, though it'll change the flavor profile. Gruyère hard to find? Comté or Emmental are solid swaps. The cream cheese can be omitted if you're watching fat, but trust me on the full-fat version—it's what makes this dish sing. For the breadcrumbs, regular panko plus a pinch of garlic powder gets you close. The olive oil? Any brand works, but California extra-virgin has a cleaner taste. And if you're prepping ahead, cook the pasta, make the sauce, and refrigerate separately—they'll come together beautifully when you're ready to bake.
This dish reheats beautifully—honestly tastes better the next day once everything melds. Keeps 4-5 days in the fridge, freezes for 3 months if you portion it properly. I always make a double batch because it disappears so fast. For serving, I like to sprinkle extra Parm and a pinch of black pepper right before baking—that final touch makes all the difference. And if anyone asks, this is the only mac and cheese they'll ever need.
Why You'll Love This Recipe
- No-Fuss Roux Magic: I swear by that simple butter-flour cook—just 3 minutes on the stove, no fancy techniques. The Gruyère melts into that roux like butter on toast, and suddenly you’ve got a sauce that’s actually velvety, not grainy.
- Cheddar-Gruyère Dream Team: Sharp cheddar brings the tang, Gruyère adds nutty depth, and together? That’s the combo that makes people pause mid-bite. (Yes, even my picky husband stops scrolling to eat more.)
- Lunchbox Hero: Between us, this is my go-to for meal prep—tastes just as good cold the next day. Pack it in a thermos for work or slice it into squares for kids’ lunches. The pasta holds up, the cheese stays happy.
- Budget Stretch Star: Four ingredients, one pot, zero waste. That block of cheddar goes a long way when paired with Gruyère, and elbow macaroni’s cheap but satisfying. Honestly, it’s the kind of meal that makes grocery day feel like a win.
Step-by-step instructions for American style mac and cheese
Here's how to build that perfect contrast—crispy golden crown over velvety, cheesy goodness.
Cook the Macaroni Al Dente
Bring a large pot of water to a rolling boil and add 1.5 lbs elbow macaroni. Stir immediately to prevent sticking. Cook until 1 minute before the package directions specify for al dente—this ensures it finishes cooking in the oven without turning mushy. I always taste-test a piece by biting into it—it should have a slight resistance but still be tender.
Reserve 1 cup of the pasta water before draining. This starchy liquid is pure gold for creating a silky sauce later. Drain the pasta and return it to the pot. Give it a quick toss with a splash of the reserved pasta water to prevent sticking while you prepare the cheese sauce. The pasta should be hot when you mix it with the sauce—this helps it absorb the creamy goodness perfectly.
Make the Ultra-Creamy Cheese Sauce
In a large, heavy-bottomed pot, melt 0.75 cup unsalted butter over medium heat until it's completely liquid. Add 0.5 cup all-purpose flour all at once and whisk vigorously for 1-2 minutes until you have a smooth, bubbling roux that smells nutty and toasty.
Slowly pour in 1.5 cups warmed whole milk while whisking constantly to prevent lumps. Bring the mixture to a gentle simmer and cook for 3-5 minutes until it thickens enough to coat the back of a spoon. Remove from heat and stir in 2 cups sharp cheddar cheese, 1 cup gruyère cheese, 8 oz cream cheese, 1 tsp garlic powder, 0.5 tsp dried mustard, 1.5 tsp salt, and 0.5 tsp black pepper.
Combine Pasta and Sauce
Add the cooked macaroni to the cheese sauce and stir gently but thoroughly until every noodle is coated in that luscious, melted cheese mixture. The sauce should look glossy and thick enough to cling to the pasta without being gluey. If it's too thick, add a splash of the reserved pasta water 1 tablespoon at a time until it reaches a smooth, creamy consistency that coats the back of a spoon.
Transfer the entire mixture to a greased 9x13-inch baking dish (use the 2 tbsp extra-virgin olive oil to grease it thoroughly). Spread it out evenly with a spatula, creating a smooth, even layer. This even distribution helps the breadcrumb topping crisp up perfectly on top.
Create the Crispy Breadcrumb Crown
In a medium bowl, mix together 1.5 cups panko breadcrumbs and 0.5 cup freshly grated parmesan cheese. Sprinkle this mixture evenly over the top of the mac and cheese, pressing down gently to help it adhere. The breadcrumbs should form a continuous layer that covers the entire surface without gaps.
Bake at 375°F for 20-25 minutes until the top is deep golden brown and the edges are bubbling. The cheese sauce should be hot and gooey underneath that crispy crown. For the best results, I like to broil for the last 1-2 minutes to get that extra-crispy finish, but watch it closely—it can burn quickly.
Rest and Serve
Remove from the oven and let it rest for 5-10 minutes before serving. This resting time allows the cheese to set slightly, making it easier to cut and serve. The contrast between the crispy breadcrumb topping and the creamy, melted cheese underneath is what makes this mac and cheese truly special.
Slice into squares and serve immediately. Each bite should deliver that perfect combination of crispy, chewy, and creamy textures. The sharp cheddar and nutty gruyère blend creates a rich, complex flavor that pairs beautifully with the subtle tang from the mustard and the garlic powder. Enjoy while it's hot—this dish is best served straight from the oven!
Pro Tips For Making American Style Mac And Cheese
- STOP RINSING THE PASTA: That last splash of water might feel like insurance, but it washes away the starch glue that binds your sauce to the noodles. American-style mac and cheese relies on that cling—skip the rinse, drain well, then toss the pasta back in the colander over the pot for 10 seconds to catch any stray starch (yes, it looks like you’re making a mess, but it works).
- GRATE YOUR CHEESE FINE: Sharp cheddar and Gruyère lose their punch when they turn to crumbles. Use the small holes of a box grater—even if it takes twice as long—and mix equal parts freshly grated cheese with the shredded kind. I learned this the hard way when my first batch tasted like melted plastic.
- LOW AND SLOW FOR THE ROUX: Whisk your butter and flour over medium-low heat for 3-4 minutes until it smells nutty but not browned—this isn’t a sear, it’s a marriage. Too hot? You’ll get a floury taste. Too cool? The cheese won’t melt right. Trust the thermometer: aim for 160°F (71°C) before adding liquid.
- SALT THE PASTA WATER: The pasta needs flavor before it ever meets the cheese sauce. Use 1½ tablespoons of salt per pound of pasta water—more than you think, especially if your cheddar is mild. Under-salted water means your final dish will taste bland, no matter how much cheese you add.
Common mistakes when making your american style mac and cheese
Overcooking the Pasta
Cooking elbow macaroni to true al dente is critical—overcooking transforms it into a mushy base that ruins texture. I’ve seen this happen when people ignore the 1-minute early rule and let the noodles soften completely.
The result? A gluey, sad mac and cheese that lacks that satisfying bite. Always taste-test by biting a piece—it should have slight resistance. 🍽️
Skipping the Roux
The roux is the foundation of that ultra-creamy sauce, and skipping it or rushing it leads to grainy, separated cheese. I’ve made this mistake when distracted, adding flour too quickly or not whisking long enough.
The result? A sauce that looks curdled instead of velvety. Take your 1-2 minutes to develop that nutty, golden roux—it’s worth the patience.
Underestimating Cheese Quality
Using pre-shredded cheese is a common shortcut that backfires—it contains anti-caking agents that make the sauce grainy. I’ve learned this the hard way when serving mac and cheese that looked perfect but tasted like sandpaper.
Always grate your own sharp cheddar and Gruyère using a microplane for the smoothest texture. The extra effort makes all the difference.
Uneven Breadcrumb Layer
A patchy breadcrumb topping leads to uneven crispiness—some areas stay soft while others burn. I’ve seen this happen when people sprinkle breadcrumbs too lightly or don’t press them down gently.
For a perfect golden crown, use 1.5 cups panko mixed with 0.5 cup Parmesan and spread it evenly, pressing down firmly. This ensures crispy coverage from edge to edge.
Broiling Too Long
Broiling for more than 1-2 minutes turns that perfect golden crown into a burnt disaster. I’ve watched this happen when I get distracted during the final step. Keep a close eye on the oven and pull it out as soon as it reaches deep golden brown.
The cheese sauce should still be creamy underneath—if it’s bubbling too aggressively, it’s time to remove it immediately. 🔥
Ignoring the Resting Time
Skipping the 5-10 minute rest after baking makes slicing nearly impossible—the cheese stays too soft and stretches. I’ve made this mistake when serving immediately, leading to a messy, runny mess. Let it set slightly before cutting—this also helps the flavors meld together for that restaurant-quality finish. Trust the process!
Nutrition facts
Frequently asked questions
Can I make this mac and cheese without baking it?
For a stovetop version, cook the pasta and cheese sauce as directed, then transfer to a serving dish. Stir in 1 cup panko breadcrumbs and 0.25 cup Parmesan until evenly distributed. Cover and let sit for 5 minutes to thicken. The texture will be creamier without the crispy topping, but still delicious. This version works great for quick weeknight dinners!
What's the best way to reheat leftover mac and cheese?
For best results, cover with foil and reheat in the oven at 350°F for 10-15 minutes until warmed through. If using the microwave, add 1-2 tablespoons milk to prevent drying out and cover with a damp paper towel. The oven method preserves that creamy texture better. Leftovers actually taste better the next day as flavors meld!
Can I substitute any of the cheeses?
Yes, but with adjustments. For Gruyère, try Comté or Emmental for similar nutty notes. If you can't find sharp cheddar, Pepper Jack works but reduces the tang. For cream cheese, Monterey Jack (melted) adds creaminess, though texture may differ slightly. Always grate your own cheese for the smoothest sauce—pre-shredded contains anti-caking agents that make it grainy.
How do I make this recipe vegetarian?
This recipe is already vegetarian! Just ensure your butter is dairy-free if needed. For a vegan version, replace the butter with vegan butter or olive oil, use vegan cheese (like Miyoko's or Violife), and check that your breadcrumbs are egg-free. The technique remains identical—just monitor the sauce closely as plant-based cheeses melt differently. The texture will be slightly different but still delicious!
What's the secret to getting that perfect crispy topping?
The golden crown comes from three key elements: using Japanese panko (not regular breadcrumbs), mixing it with Parmesan for adhesion, and pressing it down firmly before baking. Preheat your oven thoroughly and bake at 375°F—don't skip the broil for the last 1-2 minutes! The breadcrumbs should be toasted to a deep golden color, not browned. If they're not crispy enough, bake longer at 350°F after removing from the broiler.