
Appetizers
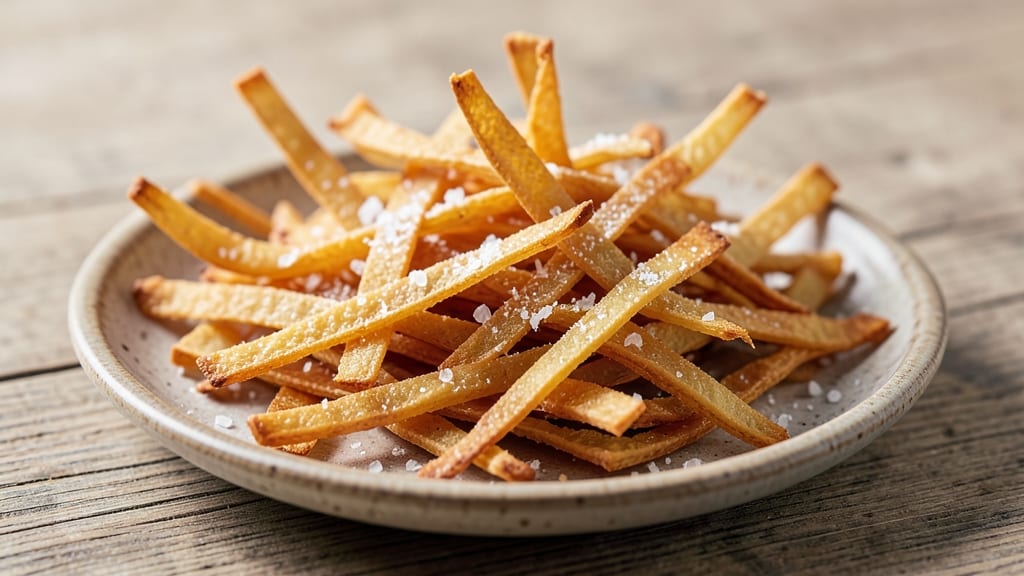
This Asiago cheese straws recipe delivers crispy, golden bites that melt in your mouth with nutty, cheesy perfection. 🔥 The secret to achieving that signature pull-apart texture and irresistible crunch lies in the right cheese-to-flour ratio and precise baking technique—no soggy or greasy results here.
These vegetarian appetizers are ideal for parties, game days, or simply satisfying that midday snack craving.
What sets these cheese straws apart is the combination of sharp Asiago cheese with a touch of Parmesan, creating a flavor profile that's both rich and complex.
The dough is rolled thin and cut into long, narrow strips, then baked until they're golden and crispy on the outside while staying tender inside. This recipe is designed to be foolproof, ensuring you'll have a batch of warm, cheesy straws ready in just 30 minutes.
By the time you're done, you'll have a tray of addictively crispy cheese straws that disappear faster than you can say "refill the bowl." The aroma alone will have everyone gathering around, and the first bite delivers that perfect balance of crunch and melt-in-your-mouth cheesiness.
These straws pair beautifully with cocktails, wine, or even just a cup of coffee for an afternoon treat.
Perfect for feeding a crowd or enjoying as a snack, these cheese straws are versatile enough to work as an appetizer or a quick snack. The recipe scales easily, so you can make just a few for a small gathering or double the batch for a party.
Let's get started on creating these irresistible bites!
Ingredients for asiago cheese straws
Crispy, cheesy perfection starts with these 10 simple ingredients—no fancy tools needed.
| Ingredient | Amount | Notes |
|---|---|---|
| Asiago Cheese, Grated 🧀 | 2 cups | Shredded finely, block preferred |
| Parmesan Cheese, Grated 🧀 | ½ cup | Freshly grated from block |
| All-Purpose Flour 🌾 | 2 ½ cups | Sifted, no substitutions |
| Unsalted Butter, Cold 🧈 | ½ cup | Cut into small cubes |
| Granulated Sugar 🍚 | 2 tbsp | For golden color |
| Salt 🧂 | ½ tsp | Diamond Crystal preferred |
| Garlic Powder 🧄 | ½ tsp | For subtle depth |
| Black Pepper 🌶️ | ¼ tsp | Freshly ground preferred |
| Ice Water 💧 | ¼ cup | Chilled for dough binding |
| Cornstarch 🌾 | 1 tbsp | For extra crispiness |
The cheese is where the magic happens. Asiago gives that nutty kick, while Parmesan adds depth. Grab a block of each from the deli counter—pre-shredded gets clumpy and lacks flavor. For the best texture, use cold butter cut into tiny cubes (no melting!). The cornstarch is non-negotiable—it's what gives those straws that signature crisp. If you're short on time, Trader Joe's sells pre-grated Asiago that works in a pinch, though freshly grated is ideal.
No Asiago? Pecorino Romano works in a bind, though it's saltier. Short on Parmesan? Extra sharp cheddar at half the amount adds a different punch. The dough needs to be cold—if it's too warm, the straws won't crisp properly. Chill the dough for 30 minutes before rolling. For extra flavor, add a pinch of onion powder or a dash of smoked paprika. The sugar isn't just for color—it helps caramelize the edges for that golden perfection.
These stay crisp for 24 hours in an airtight container at room temperature—perfect for parties. For longer storage, freeze the unbaked dough strips on a tray first, then transfer to a bag. Re-bake straight from frozen for 2-3 extra minutes. Pro tip: Double the batch and freeze half—you'll thank yourself later. The aroma alone will have guests begging for seconds.
Why You'll Love This Recipe
- No-Fuss Dough: I swear by this recipe because it’s just three ingredients (plus butter) mixed until crumbly—no kneading, no resting, no fuss. The cold butter and sugar cut into the cheese like magic, and suddenly you’ve got a dough so easy, even my 10-year-old could handle it.
- Nutty, Crispy Magic: That first bite? Crunchy outside, gooey inside, with Asiago’s sharp tang and Parmesan’s umami depth. Honestly, the sugar caramelizes just enough to give these a subtle sweetness that balances the saltiness—it’s the kind of flavor that makes you reach for another one without thinking.
- Party in a Box: These freeze like a dream, so I always make a double batch. Toss them in a container, and they’re ready for game day, potlucks, or when your kid’s soccer team needs snacks. (Yes, even on a Tuesday night.)
- Pantry Staple Power: You already have everything. Flour, butter, sugar—check. Cheese? Same shelf. No specialty trips, no extra shopping. And because they’re small, they stretch farther than you’d think, so you’re not wasting a thing. My secret weapon for lazy nights.
Step-by-step instructions for Asiago cheese straws
Here's how to make golden, shatteringly crisp cheese straws that'll disappear in minutes.
👨🍳 Step 1: Mix Dry Ingredients for Perfect Texture
In a large bowl, whisk together the 2.5 cups all-purpose flour, 1 tablespoon cornstarch, 2 tablespoons granulated sugar, 0.5 teaspoon salt, 0.5 teaspoon garlic powder, and 0.25 teaspoon black pepper. I sift the flour first to eliminate lumps—this ensures your straws will be light and airy, not dense. The cornstarch is key here; it adds that extra crispiness we're after.
Give everything a good stir until the garlic powder and pepper are evenly distributed. You're building the foundation for that nutty, savory flavor that makes these straws irresistible. Set this mixture aside while you prepare the wet ingredients—we'll combine them in just a minute.
🥘 Step 2: Cut in Cold Butter for Flaky Layers
Add the 0.5 cup cold unsalted butter (cut into small cubes) to the dry ingredients. Using a pastry cutter or your fingers, work the butter into the flour mixture until you achieve pea-sized crumbs with some flour still clinging to them. This texture is crucial—it creates those beautiful flaky layers when baked.
I press down gently with my fingers to break up any large butter pieces, but I don't overwork the mixture. The butter needs to stay cold to develop those crispy, shatterable layers. If you see any large butter chunks, cut them with a knife first to speed up the process.
👨🍳 Step 3: Combine Cheeses and Add Ice Water
Add the 2 cups grated Asiago cheese and 0.5 cup grated Parmesan cheese to the butter-flour mixture. The Asiago brings that distinctive nutty flavor while the Parmesan adds depth and saltiness. Mix everything together with a fork or your hands until the cheeses are evenly distributed throughout the crumbly mixture.
Now, drizzle in the 0.25 cup ice water one tablespoon at a time while mixing with your hands. The ice water is essential—it binds everything together without making the dough sticky. You'll know you've added enough when the mixture comes together into a soft, pliable dough that holds when pressed gently. If it's too dry, add a splash more water; if too sticky, chill for 5 minutes before proceeding.
🔥 Step 4: Roll and Cut for Perfect Straws
Divide the dough into 4 equal pieces (about 1/4 of the total dough each) and wrap 3 of them in plastic wrap. Keep one piece unwrapped while you work with it. Roll each piece into a 1/4-inch thick log on a lightly floured surface. I use a rolling pin for this, but you can also use a wine bottle or even a wooden spoon in a pinch.
Unwrap another piece of dough and roll it out while keeping the others wrapped. The goal is to keep the dough cold—this prevents the cheese from melting prematurely and ensures crispy straws. Cut each log into 1/4-inch thick slices. Arrange the slices on a parchment-lined baking sheet, leaving about 1 inch between each piece so they don't spread into one another during baking.
⏰ Step 5: Bake Until Golden and Crispy
Preheat your oven to 375°F while you prepare the straws. Once the oven is fully preheated, bake the cheese straws for 12-15 minutes, rotating the baking sheet halfway through, until they're golden brown and look crispy. Here's the thing—don't walk away! Check them at the 12-minute mark because ovens vary.
You'll know they're perfectly done when the edges are golden brown and the centers still look slightly soft (they'll crisp up as they cool). For extra crispiness, transfer them to a wire rack to cool for 5 minutes before serving. They'll be shatteringly crisp at first, but they soften slightly as they cool—this is normal and actually makes them more enjoyable to eat.
Pro Tips For Making Asiago Cheese Straws
- Chill the Dough Properly: I learned this the hard way—when the dough sits too long at room temperature, the butter melts unevenly and your straws turn greasy instead of crisp. Wrap the dough in plastic and refrigerate for at least 30 minutes (or up to 24 hours), then roll it out cold—this keeps the layers tight and the texture perfect.
- Mix Cheeses by Weight: Using grated cheese straight from the bag? You’re playing roulette. Weigh your Asiago and Parmesan (aim for a 2:1 ratio) and grate them fresh—pre-shredded cheese has anti-caking agents that make the dough gummy. A fine grate (like a box grater) ensures even distribution and melty perfection.
- Cut Thin, Space Evenly: Skip the freehand scissors—use a sharp knife or pizza cutter to slice the dough into ¼-inch strips (any thicker and they’ll be doughy inside). Arrange them on the baking sheet with ½-inch gaps so they don’t steam and lose their crispness. Crowd them, and you’ll end up with sad, soggy bottoms.
- Bake in Stages: Don’t walk away. Start with a hot oven (425°F) for the first 5 minutes to set the edges, then drop to 375°F for 8–10 minutes. This two-step method guarantees a golden crust without burning the outside while the inside stays tender. (Yes, even if you’re impatient like me.)
Serving suggestions for asiago cheese straws
Wine Pairings
These nutty, crispy cheese straws pair beautifully with dry white wines that complement their rich, cheesy flavor. I love serving them with a crisp Pinot Grigio from Italy—its bright acidity cuts through the richness while enhancing the Asiago's nutty notes.
For a bolder option, try a Chardonnay with subtle oak notes, which adds a creamy texture that mirrors the cheese straws' melt-in-your-mouth quality. 🍷
Cocktail Companions
For a festive touch, serve your cheese straws with a refreshing gin and tonic topped with a twist of lemon. The citrusy bite balances the savory cheese perfectly. I also love pairing them with a dry rosé—its crisp, fruity notes create a delightful contrast.
If you're hosting a party, a signature cocktail like a Spritz (Aperol, Prosecco, and soda water) adds a fun, bubbly element that guests will love.
Dip Ideas
While these straws are delicious on their own, they're even better with a dip! A warm marinara sauce adds a tangy contrast that makes each bite even more satisfying. For something lighter, try a garlic aioli—the creamy, garlicky flavor complements the cheese beautifully.
I also enjoy a simple balsamic reduction drizzle for an elegant touch that elevates the dish to restaurant-quality.
Party Presentation
For gatherings, arrange the cheese straws on a large platter and serve them in a glass bowl or a rustic wooden tray to keep them crispy longer. Garnish with fresh parsley leaves or rosemary sprigs for a pop of color and aroma.
If you're feeling fancy, dust them lightly with smoked paprika or crushed red pepper flakes right before serving. The visual appeal will have guests reaching for seconds before you even say "help yourself."
Breakfast Twist
Who says cheese straws are just for parties? Serve them alongside a hearty breakfast—think scrambled eggs or a vegetable frittata. The salty, crispy straws add a satisfying crunch that balances the softness of eggs.
For a sweet-savory combo, pair them with fruit compote or a drizzle of honey on top of Greek yogurt. It’s a breakfast game-changer that’ll have everyone asking for the recipe. 💫
Nutrition facts
Frequently asked questions
Why do my cheese straws turn out greasy instead of crispy?
Greasy straws usually happen when the cheese melts too much during baking. Keep your dough cold by chilling it for 30 minutes before rolling, and use cold butter cut into small cubes. Bake at 375°F for 12-15 minutes—don't overbake, or they'll lose crispness. Also, avoid overcrowding the baking sheet!
Can I make these straws ahead of time?
These stay crispy for 24 hours in an airtight container at room temperature. For longer storage, freeze unbaked dough strips on a tray, then transfer to a bag. Re-bake straight from frozen for 2-3 extra minutes at 375°F. Pro tip: Freeze half the batch—you'll always be prepared for guests!
What's the best way to cut the dough for perfect straws?
Roll each dough log to 1/4-inch thickness using a rolling pin or wine bottle. Cut into 1/4-inch thick slices with a sharp knife—this ensures even baking and that signature crispy texture. Arrange them 1 inch apart on the baking sheet so they don't spread together during baking.
Can I substitute Asiago cheese with something else?
Yes! If you can't find Asiago, try Pecorino Romano (saltier) or extra sharp cheddar (half the amount). For a milder flavor, Parmesan alone works, but the nutty depth of Asiago is what makes these straws special. Pre-shredded cheese gets clumpy—always use freshly grated from a block for best results.
How do I keep the straws crispy when serving?
Serve them straight from the oven or on a wire rack to maintain crispness. For parties, transfer to a glass bowl or wooden tray instead of a metal platter—metal conducts heat and makes them soften faster. Keep them warm in a 200°F oven for up to 30 minutes if needed.