
Breakfast & Brunch
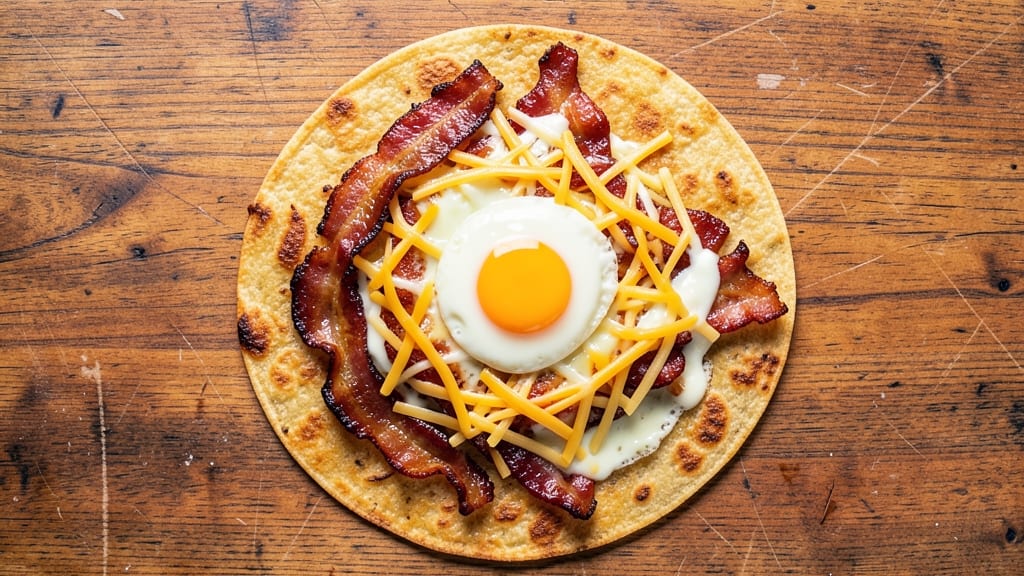
This bacon egg and cheese quesadilla recipe delivers crispy edges, melted cheese, and a runny yolk surprise in every bite—perfect for breakfast or brunch. The secret lies in properly heating the tortilla and cooking the filling in stages to preserve texture.
After years of perfecting this dish, I’ve found the ideal balance between crispy bacon, creamy cheese, and that satisfying yolk surprise that makes it irresistible.
The key to success is starting with high-quality ingredients: thick-cut bacon for maximum crispiness, fresh eggs for that perfect runny yolk, and a blend of cheeses for a creamy, melty texture.
You’ll warm the tortillas in a dry skillet first to prevent sogginess, then layer the filling and cook until golden brown. This method ensures every bite has that satisfying crunch and rich, savory flavor.
What you’ll end up with is a quesadilla with perfectly crispy edges, gooey melted cheese, and a runny yolk that oozes out when you take the first bite. The bacon adds a smoky depth, while the eggs bring a creamy, rich element that ties everything together.
It’s the kind of dish that’s simple to make but feels like a restaurant-quality meal.
Serve with a side of salsa or sour cream for dipping, or top with fresh avocado for extra freshness. This recipe is versatile enough for breakfast, brunch, or even a late-night snack. Let’s get cooking!
Ingredients for bacon egg and cheese quesadilla
Thick-cut bacon, fresh eggs, and sharp cheeses—these are the stars of your perfect quesadilla.
| Ingredient | Amount | Notes |
|---|---|---|
| Thick-Cut Bacon 🥓 | 6 oz | Cooked until crispy, drained |
| Large Eggs 🥚 | 4 whole | Fresh for runny yolk |
| Flour Tortillas 🌯 | 4 whole | Medium size, 8-10 inches |
| Shredded Monterey Jack Cheese 🧀 | 1 ½ cups | Freshly shredded preferred |
| Shredded Cheddar Cheese 🧀 | 1 cup | Sharp variety for flavor |
| Unsalted Butter 🧈 | 2 tbsp | For tortilla crispiness |
| Salt 🧂 | ½ tsp | Kosher or sea salt |
| Ground Black Pepper 🌶️ | ¼ tsp | Freshly ground preferred |
| Vegetable Oil 🫒 | 1 tbsp | For skillet coating |
| Fresh Cilantro 🌿 | ¼ cup | Chopped, for garnish |
| Sour Cream 🥛 | ¼ cup | For serving |
| Salsa 🍅 | ½ cup | Mild or medium heat |
The bacon is non-negotiable here. Thick-cut gives you that smoky, crispy texture—regular bacon gets too soft. Cook it until it's a deep golden brown, then drain on paper towels. Costco or local butcher sections usually carry the best quality. For the eggs, freshness matters—look for eggs with bright yolks at the store. The tortillas? Burrito-size flour tortillas from Mission or La Tortilla Factory hold up best. Skip the pre-shredded cheese—it gets gummy when melted. Shred your own from a block for that perfect texture.
No thick-cut bacon? Regular bacon cooked extra crispy works in a pinch. Short on time? Pre-cooked bacon bits from the deli section can be tossed in, but you'll lose that satisfying crunch. Eggs too runny? Undercook them slightly—they'll firm up a bit when layered. The cheese blend is key: Monterey Jack melts smoothly, while sharp cheddar adds that tangy kick. No cheddar? Pepper jack or peppered Monterey Jack gives you a similar flavor punch. For the skillet, nonstick is ideal, but any heavy-bottomed pan works if you use a little oil. The cilantro is optional but adds that fresh finish—skip if you hate it.
Keep the cooked bacon in an airtight container for 3-4 days in the fridge, but honestly, it's best used fresh. The shredded cheese? Use within 2 days for peak flavor. Tortillas freeze beautifully—wrap them in foil and freeze for up to 3 months. Assemble the quesadillas ahead and refrigerate, then cook straight from the fridge for that extra-crispy edge. Leftovers? Reheat in a dry skillet for best results—microwaving makes them soggy.
Why You'll Love This Recipe
- Here’s what sold me: the contrast. Crunchy bacon edges, a tortilla so golden it’s almost burnt (but in a good way), and the inside? Gooey cheese and a perfectly cooked egg. That crispy edge with the creamy center? Chef’s kiss every time.
- Five-Ingredient Magic: I swear by this recipe because it’s the kind of meal that feels like a hug—crispy bacon, runny yolks, and that perfect melty cheese pull. No fancy techniques, just layering and folding, and suddenly you’ve got something that tastes like it took hours.
- Crispy-Creamy Balance: Here’s what sold me: the contrast. Crunchy bacon edges, a tortilla so golden it’s almost burnt (but in a good way), and the inside? Gooey cheese and a perfectly cooked egg. That crispy edge with the creamy center? Chef’s kiss every time.
- Breakfast or Dinner: Between us, this quesadilla works for any meal—even if you’re making it at 11 p.m. after a long day. My kids ask for it on weekends, but I keep it in my weeknight rotation because it’s unfussy and always hits the spot.
Step-by-step instructions for bacon egg and cheese quesadillas
Here's how to make perfectly crispy quesadillas with that perfect runny yolk surprise.
Cook the Bacon to Crispy Perfection
Place the 6 oz thick-cut bacon in a cold skillet over medium heat. Cook for 12-15 minutes, flipping occasionally, until the bacon is deep golden brown and crispy. The fat should render out nicely, leaving you with about 2 tablespoons of bacon fat in the pan.
Real talk: Don't rush this step. You want the bacon to be fully crispy and the fat rendered before removing it. Once done, transfer the bacon to a paper towel-lined plate and drain for 2 minutes to remove excess fat. Reserve the bacon fat in the pan—it's flavor gold for crisping your quesadillas.
Prepare the Egg and Cheese Filling
In a medium bowl, whisk together the 4 whole large eggs with 0.5 teaspoon salt and 0.25 teaspoon ground black pepper until fully combined. This simple seasoning ensures each bite has balanced flavor without overpowering the other ingredients.
In a separate bowl, combine the 1.5 cups shredded Monterey Jack cheese and 1 cup shredded cheddar cheese. I like to mix them well so each bite has that perfect blend of mild and sharp cheeses. Keep these separate from the eggs until ready to assemble—this prevents the cheese from getting soggy.
Assemble and Cook the Quesadillas
Heat a clean skillet over medium heat and add 1 tablespoon vegetable oil. Once hot, add 2 tablespoons unsalted butter to the pan along with the reserved bacon fat. This combination gives you that perfect crispy texture without burning the tortillas.
Place one flour tortilla in the skillet and immediately sprinkle half of the cheese mixture evenly over one half of the tortilla. Add 2 crispy bacon strips and 1 whole egg to the same half. Fold the tortilla over to enclose the filling, pressing gently with a spatula to help the cheese melt and stick.
Cook for 2-3 minutes per side until the tortilla is golden brown and crispy, and the egg is just set but still runny in the center. The key here is to keep the heat at medium—too high and you'll burn the outside before the egg cooks through. Remove from pan and keep warm while you assemble the remaining quesadillas.
Serve with Fresh Garnishes
Cut each quesadilla into 4 wedges and arrange on a serving platter. Spoon 0.5 cup salsa around the edges and dollop with 0.25 cup sour cream. Garnish with 0.25 cup chopped fresh cilantro for a pop of color and freshness.
Serve immediately while the quesadillas are still warm and crispy. The cheese should be fully melted, the tortillas perfectly crispy, and that egg yolk should still be runny in the center—trust me, it's worth the wait. Each bite delivers the perfect balance of smoky bacon, creamy cheese, and that rich egg surprise.
Pro Tips For Making Bacon Egg And Cheese Quesadilla
- CRISP THE BACON FIRST: Thick-cut bacon takes forever to crisp properly, and nothing ruins a quesadilla like soggy, greasy bacon. Cook it until the edges are deep golden and the fat renders out—about 8-10 minutes on medium heat—then drain it on paper towels. Pro move: Save that bacon fat in a jar for next time; it’s liquid gold for tortillas.
- PRE-SALT THE EGGS: Eggs in quesadillas can taste bland if you skip this. Crack them into a bowl, add a generous pinch of salt (about ¼ teaspoon per egg), and whisk just until the yolks and whites are combined. The salt dissolves into the egg, so no gritty surprises later—just a richer, more cohesive filling.
- LAYER CHEESE THINLY: Dumping a mountain of cheese in the center creates a greasy, uneven mess. Spread shredded Monterey Jack and cheddar in an even, thin layer—about ¼ cup per tortilla—leaving a ½-inch border around the edges. This guarantees a crispy crust without a cheese avalanche.
- PRESS HARD AND LOW: The first 30 seconds after flipping is where most quesadillas fail. Press down firmly with a spatula over medium-low heat for 20 seconds to melt the cheese evenly, then let it cook undisturbed until the bottom turns golden. No peeking—just patience. (Yes, even if you’re impatient like me.)
Storing and reheating this bacon egg and cheese quesadilla
Refrigerator Storage
Assembled quesadillas store best in the fridge for up to 2 days if you want to prep ahead. Let them cool completely, then wrap individually in parchment paper or place in an airtight container with a paper towel on top to prevent sogginess.
I like using Glasslock containers because they keep the quesadillas crispier longer than plastic. Reheat in a dry skillet for that perfect texture. 🧊
Freezer-Friendly Method
For longer storage, freeze uncooked quesadillas by assembling them as directed, then wrapping each tightly in plastic wrap followed by aluminum foil. They'll keep in the freezer for up to 3 months.
When ready to eat, cook straight from frozen in a skillet with 1 extra tablespoon oil—no need to thaw first. The extra fat helps crisp the tortillas properly.
Reheating for Crispy Results
Never microwave leftovers—they'll turn rubbery. Instead, heat in a clean skillet over medium heat with ½ tablespoon vegetable oil for 2-3 minutes per side until golden brown.
For extra crispiness, press down gently with a spatula during reheating. If the cheese looks dry, add 1 teaspoon water to the pan to restore meltiness. 🔥
Egg Safety Note
If reheating quesadillas with eggs, aim for an internal temperature of 165°F to ensure safety. The runny yolk is delicious fresh but should be fully cooked when reheated.
I recommend assembling without eggs if you're making ahead, then adding them fresh when cooking. This keeps the yolk perfectly runny while still being safe to eat.
Reviving Soggy Tortillas
If your stored quesadillas lose crispness, revive them by reheating in a dry skillet for 1 minute per side over medium heat. For extra crunch, sprinkle ¼ teaspoon cornstarch on the tortilla before reheating—it acts as a crisping agent.
This trick works especially well for tortillas that spent time in the fridge or freezer. ✨
Make-Ahead Assembly Tip
Save time by prepping all fillings separately and storing them in the fridge. Keep the bacon, cheese, and eggs in separate containers, then assemble quesadillas just before cooking.
This method prevents soggy tortillas and keeps all components at their best. I often do this when hosting brunch—it makes serving a crowd much easier! 💪
Nutrition facts
Frequently asked questions
Can I make these quesadillas ahead of time?
Assemble them without the eggs, wrap in plastic, and refrigerate for up to 2 days. Cook fresh when ready—add the egg just before serving to keep that perfect runny yolk. For longer storage, freeze unassembled components separately in airtight containers for up to 3 months.
What's the best way to get crispy tortillas?
Heat your skillet to medium heat and warm the tortillas for 30 seconds per side before adding fillings. Use a mix of butter and bacon fat—this combo creates golden-brown crispiness without burning. Press gently with a spatula while cooking to help the cheese melt evenly.
Can I use pre-cooked bacon bits?
Yes, but you'll lose that satisfying crunch. For best results, use thick-cut bacon cooked until crispy. If short on time, try bacon crumbles from the deli section—just add 1 extra tablespoon to compensate for the smaller pieces. The flavor won't be identical, but it still works in a pinch.
How do I fix a runny egg that's overcooked?
If your egg turns out too firm, try this trick: After cooking, place the quesadilla back in the skillet for 10 seconds with 1 teaspoon water in the pan. The steam will help restore some of that creamy texture. For future attempts, remove the quesadilla when the egg is just set (about 2 minutes per side).
What are good sides for this brunch dish?
Classic pairings include avocado slices, salsa verde, or black beans for extra protein. For a lighter option, try mango salsa or a fresh citrus salad. The smoky bacon flavor works beautifully with tangy or creamy elements—think sour cream or guacamole for dipping.