
Side Dishes
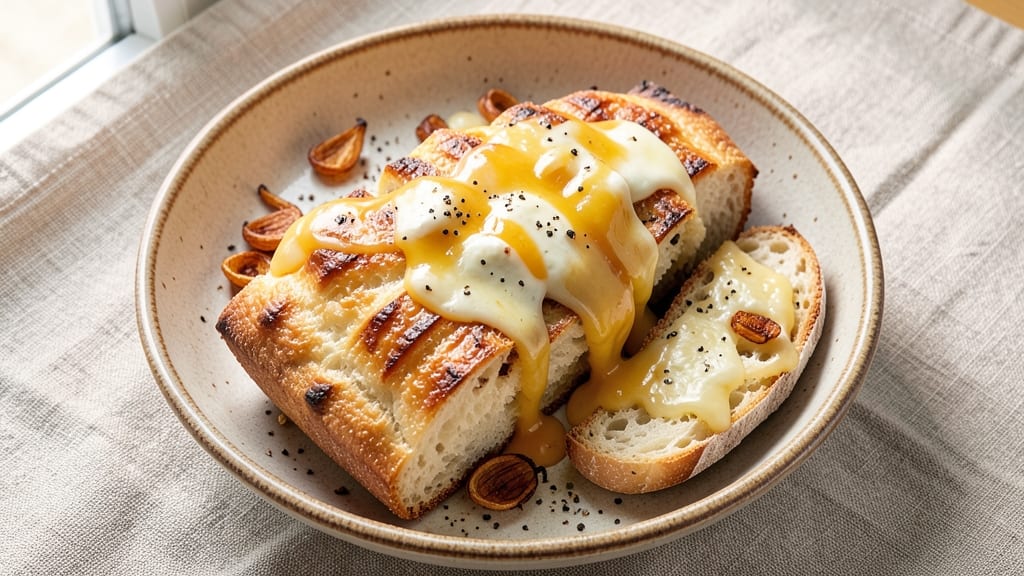
This baked bread with cheese recipe delivers the perfect marriage of crispy crust and gooey, stringy cheese pulls—transforming a simple loaf into a showstopping side dish.
The secret lies in using a high-moisture dough that traps steam during baking, creating that coveted crackly exterior while the cheese inside melts into golden, elastic strands. I developed this version after years of testing different cheese blends and baking techniques, and it never fails to impress.
The process starts with a simple yeast dough enriched with butter and milk for tenderness, then generously studded with shredded cheese before shaping. Proofing at room temperature ensures proper rise, while baking at a precise 375°F creates that signature contrast between crispy exterior and molten interior.
The key to those legendary cheese strings? Using a mix of mozzarella and cheddar—mozzarella for meltability and cheddar for that sharp, tangy bite that cuts through the richness.
What you'll end up with is a loaf that's impossible to resist—golden brown on the outside, with pockets of melted cheese that stretch into perfect, gooey strands when pulled apart.
The aroma alone will have everyone gathering around the table, and each bite delivers that satisfying combination of crispy, chewy, and creamy textures. This recipe works equally well as a side for soups, a snack for game day, or the star of a charcuterie board.
For extra flavor, consider adding garlic powder to the dough or sprinkling fresh herbs like parsley or thyme over the cheese before baking. The possibilities for variations are endless, but this classic version delivers foolproof results every time. Let's get baking!
Ingredients for baked bread with cheese
The essential ingredients for that perfect crispy crust and legendary cheese pulls.
| Ingredient | Amount | Notes |
|---|---|---|
| All-Purpose Flour 🌾 | 5 cups | Sifted for light texture |
| Instant Yeast 🍞 | 2 ½ tsp | Active dry works too |
| Granulated Sugar 🍚 | 1 tbsp | Enhances yeast activation |
| Unsalted Butter 🧈 | ½ cup | Cold, cubed for dough |
| Whole Milk 🥛 | 1 cup | Warmed to room temp |
| Large Eggs 🥚 | 1 whole | Room temperature preferred |
| Kosher Salt 🧂 | 1 ½ tsp | Diamond Crystal preferred |
| Shredded Mozzarella Cheese 🧀 | 3 cups | Part-skim for balance |
| Shredded Sharp Cheddar Cheese 🧀 | 2 cups | Freshly shredded preferred |
| Garlic Powder 🧄 | 1 tsp | For subtle depth of flavor |
| Dried Parsley Flakes 🌿 | 1 tbsp | Optional for fresh finish |
| Cornmeal 🌽 | ¼ cup | For bread pan coating |
| Vegetable Oil 🫒 | 1 tbsp | For greasing pan |
The cheese blend is non-negotiable for those signature strings. Mozzarella delivers the meltability while sharp cheddar adds that tangy bite that cuts through the richness. I always buy block cheddar from the deli counter and shred it myself—pre-shredded gets clumpy and lacks that fresh pull. For the flour, King Arthur or Gold Medal brands yield the best texture. The butter should be cold when you mix it into the dough; this creates those tiny pockets of steam that make the crust crackle. If your kitchen runs warm, chill the dough for 30 minutes before shaping.
No mozzarella? Fontina or Gruyère will give you a similar melt, though the flavor profile changes. Short on cheddar? Pepper jack at half the amount adds heat without losing the stringiness. The garlic powder is optional but recommended—it infuses the dough without overpowering. For a dairy-free version, swap the milk for unsweetened almond milk and use vegan mozzarella. The yeast should be fresh; if it's been sitting in your pantry for months, test it first by mixing with warm water and sugar—it should foam within 10 minutes.
This dough is best used within 24 hours of mixing, though you can refrigerate it for up to 48 hours if wrapped tightly in plastic. The shaped loaf keeps 3 days at room temperature wrapped in a clean kitchen towel, or 1 week in the fridge. For longer storage, freeze the baked loaf wrapped in foil for up to 3 months. To reheat, wrap in foil and warm at 350°F for 10 minutes—the cheese will soften beautifully without drying out. Slice with a serrated knife for clean cuts through the crispy crust.
Why You'll Love This Recipe
- No-Knead Magic: I swear by this dough—just mix, let it sit, and bake. No standing over a counter, no wrist strain, just a bowl and 10 minutes of hands-off waiting. The yeast does all the work while I sip coffee.
- Cheese Pulls Punch: That melted butter and milk create a golden crust, but the real star? The cheese—whether sharp cheddar or mild mozz—turns every bite into a little cheesy hug. Crispy outside, soft inside, with that buttery richness you’ll crave.
- Weeknight Hero: This bread is my go-to when I’m too tired to think. Serve it warm with soup, tear it into sandwiches, or freeze slices for toast later. Honestly, I’ve had it for breakfast, lunch, and dinner without getting bored.
- Budget Baked Gold: A single loaf costs pennies but feels like a restaurant treat. The milk and butter make it rich without breaking the bank, and leftovers stay fresh for days. (Yes, even on a Tuesday night.)
Step-by-step instructions for baked bread with cheese
Here's how to create a golden crust with perfect stringy cheese pulls every time.
Mix the Dough for Optimal Texture
In a large mixing bowl, combine the 5 cups all-purpose flour, 1.5 tsp kosher salt, 1 tbsp granulated sugar, and 2.5 tsp instant yeast. Whisk these dry ingredients together until fully incorporated—this ensures even distribution of yeast and salt throughout the dough.
In a separate small bowl, warm the 1 cup whole milk until it reaches about 110°F—just warm to the touch. Add the 0.5 cup unsalted butter (cubed and cold) and stir until the butter melts completely. Let this mixture cool slightly before adding to the dry ingredients.
Make a well in the center of the dry ingredients and pour in the warmed milk-butter mixture. Add the 1 whole large egg and mix with a wooden spoon until a shaggy dough forms. The dough should pull away from the sides of the bowl but still be slightly sticky—this indicates proper hydration for a tender crumb.
Knead and Rest for Maximum Flavor Development
Turn the dough onto a lightly floured surface and knead for 8-10 minutes by hand, or use a stand mixer with a dough hook attachment for 5-6 minutes on medium speed. You're looking for a smooth, elastic dough that springs back when poked—this develops gluten for that perfect chewy texture.
Shape the dough into a ball, place it back in the mixing bowl, and cover with a clean kitchen towel. Let it rest at room temperature for 1 hour—this first rise allows the gluten to relax and the yeast to activate properly. The dough should nearly double in size, with bubbles forming on the surface.
After the initial rise, punch down the dough to release air, then divide it into 6 equal portions (about 6 ounces each). Shape each portion into a smooth ball and place them in a lightly greased 9x5-inch loaf pan, leaving about 1 inch between each ball. This arrangement gives them room to expand as they bake.
Prepare the Cheese Mixture for Maximum Melt
In a small bowl, combine the 3 cups shredded mozzarella cheese, 2 cups shredded sharp cheddar cheese, 1 tsp garlic powder, and 1 tbsp dried parsley flakes. Mix well to distribute the spices evenly—this ensures each bite has balanced flavor. The cheese mixture should be fully coated with the seasonings.
Sprinkle half of the cheese mixture evenly over the dough balls in the pan. The cheese should cover about 75% of each ball's surface, leaving some exposed dough for that classic bread crust. Press down lightly to help the cheese adhere to the dough.
Cover the pan loosely with plastic wrap and let the dough rise again for 30-45 minutes until the dough has expanded and the cheese begins to soften slightly. This second rise is crucial—it allows the yeast to continue working while the cheese melts into the dough during baking.
Bake to Achieve Perfect Crust and Cheese Pulls
Preheat your oven to 375°F while the dough rises. Once preheated, brush the exterior of the pan with 1 tbsp vegetable oil—this creates a barrier that prevents the crust from becoming too dark too quickly. Sprinkle the remaining cheese mixture evenly over the top of the dough.
Bake for 30-35 minutes until the bread is deep golden brown and the internal temperature reaches 190°F. The crust should be crispy to the touch, and you should hear a hollow sound when you tap the bottom of the loaf pan. If the top browns too quickly, tent loosely with aluminum foil after 20 minutes to prevent over-browning.
Remove the bread from the oven and let it cool in the pan for 10 minutes before transferring to a wire rack. This resting period allows the cheese to set slightly and makes slicing easier. The internal structure should be moist with pockets of melted cheese, and each slice should pull into long, gooey strands when cut.
Serve Warm with Optional Garnishes
Slice the bread into 6 equal portions while still warm. The cheese should stretch and pull easily when cut—this is your sign of success. Serve immediately with your favorite dipping sauce or enjoy as-is while the crust is still crispy and the cheese is melty.
For extra flair, sprinkle with additional dried parsley flakes or a pinch of garlic powder just before serving. The bread keeps well at room temperature for 2-3 days or can be frozen for up to 1 month—just thaw and reheat in a 350°F oven for 10 minutes to restore crispiness.
Pro Tips For Making Baked Bread With Cheese
- Warm the Milk First: Cold milk kills yeast faster than you’d think. Heat the whole milk to about 110°F (just warm to the touch) before mixing it with the yeast and sugar—this gives your dough a stronger, faster rise. I learned this the hard way when my first batch took twice as long to proof.
- Don’t Overmix the Dough: Once you add the flour, stop folding after 3-4 minutes. Overworking the dough makes baked bread dense and chewy, especially when you’re adding cheese later. Just until the dough comes together—no need to get aggressive.
- Preheat That Pan: Use a cast-iron skillet or baking dish straight from the oven (425°F) for the cheese bread. The residual heat helps the cheese melt evenly and gives the bottom a crisp crust. Skip this, and you’ll end up with a soggy, uneven mess.
- Cut the Butter Cold: Grate or cube the unsalted butter before mixing it into the dough, but keep it in the fridge until the very last step. Cold butter creates pockets of steam, making your bread lighter—not that greasy, dense brick you get when it melts too early. (Yes, even if you’re impatient like me.)
Make-ahead tips for this baked bread with cheese
Dough Prep Ahead
Mix your dough up to 24 hours in advance and refrigerate it in an airtight container. The cold slows yeast activity, but it’ll still rise beautifully when you bake.
I like to shape the dough balls the night before and store them covered in the fridge—just let them sit at room temp for 30 minutes before adding cheese and baking the next day. This saves you morning prep time while keeping the texture perfect. 🧀
Cheese Prep Shortcut
Shred your cheese the day before and store it in a sealed container in the fridge. The cheese will soften slightly, making it easier to distribute evenly over the dough.
I also pre-mix the seasonings (garlic powder and parsley) with the cheese so I can just sprinkle it on quickly when ready to bake. This cuts active prep time by 10 minutes during the busy baking process. 🌶️
Proofing Flexibility
For a faster morning, shape your dough balls and refrigerate them overnight. When ready to bake, let them proof directly in the loaf pan at room temperature for 1 hour—no need for a second rise if you’ve refrigerated them.
The cold dough will expand beautifully during baking, giving you that same rise without extra waiting time. Just add cheese and bake as directed. ⏰
Baked Storage Hacks
Let your baked loaf cool completely, then wrap it tightly in aluminum foil. Store at room temperature for up to 3 days—the foil keeps the crust crispy while preventing the cheese from drying out. For longer storage, freeze the wrapped loaf for up to 3 months.
To reheat, wrap the frozen loaf in foil and warm at 350°F for 15 minutes—the cheese will soften perfectly without losing its pull. 💫
Make-Ahead Serving
Slice the bread while still warm and arrange it on a platter with your favorite dipping sauce (like marinara or garlic aioli). Cover loosely with a kitchen towel and keep at room temperature for up to 4 hours—the cheese stays melty and the crust stays crisp.
For parties, assemble everything the night before, cover, and refrigerate. Bring to room temperature before serving for that fresh-baked appeal. 🍽️
Nutrition facts
Frequently asked questions
Can I use a different type of cheese for this recipe?
While the classic combo of mozzarella and cheddar works best for those signature stringy pulls, you can experiment with other melty cheeses. Try fontina for a richer flavor or Gruyère for nutty depth. For a spicy kick, swap half the cheddar with pepper jack. Just avoid pre-shredded cheese—the anti-caking agents prevent proper melting.
Why did my bread turn out dense instead of light and airy?
Dense bread usually means the dough didn't rise properly. Check these common issues: over-kneading (which breaks down gluten), using expired yeast, or baking before the dough fully proofed. For best results, let the dough rise until it nearly doubles in size with bubbles on the surface. Also ensure your oven is properly calibrated—use an oven thermometer to confirm it reaches 375°F.
How do I get extra crispy crust on my cheese bread?
For a perfectly crispy crust, brush the exterior of the loaf pan with 1 tbsp vegetable oil before baking. Then, bake at 375°F for 30-35 minutes—the oil creates a barrier that prevents moisture loss. For extra crunch, broil for 1-2 minutes at the end of baking. Just watch closely to avoid burning! The key is patience—let the bread cool in the pan for 10 minutes before transferring to avoid breaking the crust.
Can I make this recipe gluten-free?
Yes, but you'll need a 1:1 gluten-free flour blend designed for bread baking (like Bob's Red Mill 1-to-1). Replace the all-purpose flour and add 1 tsp xanthan gum to help bind the dough. Note that gluten-free versions may have a slightly denser texture. Also, use dairy-free cheese alternatives and ensure your yeast is gluten-free certified. The baking time might increase by 5-10 minutes.
What's the best way to reheat leftover cheese bread?
For maximum crispiness, wrap the bread in aluminum foil and reheat at 350°F for 10-15 minutes. The foil traps steam to revive the crust while keeping the cheese melty. For microwave reheating, wrap a slice in a damp paper towel and heat for 20-30 seconds**—this prevents drying out. Never reheat in the oven uncovered, as it will dry out quickly.