
Appetizers
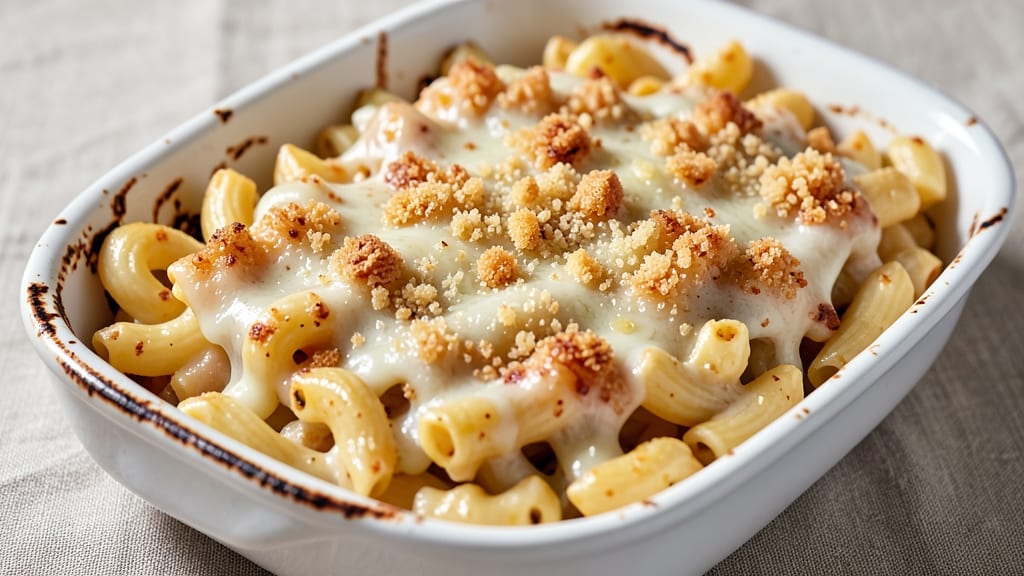
This baked breaded mac and cheese delivers the ultimate comfort food experience—crispy golden breadcrumbs on top and a gooey, pull-apart center that melts in your mouth.
The secret lies in the perfect balance of technique and ingredients, creating a dish that's both restaurant-worthy and surprisingly simple to make at home. I've perfected this recipe over years of testing, ensuring every bite delivers that satisfying contrast of textures and flavors.
The foundation starts with a rich, velvety cheese sauce made from sharp cheddar, Gruyère, and cream cheese, then baked until bubbly and golden. The breading mixture—buttery, crispy, and perfectly seasoned—gets sprinkled on top just before baking, creating that coveted crunch while keeping the interior creamy.
This isn't your average mac and cheese; it's a showstopper that holds its shape, stays warm, and tastes even better the next day.
What you'll end up with is a dish that looks as impressive as it tastes—golden, bubbling, and impossible to resist. The crispy breadcrumb topping adds a satisfying crunch, while the cheese pulls apart in gooey, melty strands with every forkful.
It's the kind of recipe that transforms a simple weeknight dinner into something special, perfect for feeding a crowd or treating yourself to a luxurious comfort meal.
Ready in just 45 minutes, this recipe is designed for foolproof results—no fancy equipment or advanced skills required. Whether you're serving it as a main dish or an appetizer, the combination of crispy, creamy, and cheesy will have everyone asking for seconds.
Here's how to make it perfectly every time.
Ingredients for baked breaded mac and cheese
Crispy, cheesy, and impossible to resist—just 15 ingredients for showstopping comfort food magic.
| Ingredient | Amount | Notes |
|---|---|---|
| Elbow Macaroni 🍝 | 1 ½ lb | Uncooked, medium or jumbo size |
| Sharp White Cheddar Cheese 🧀 | 2 cups | Shredded, block preferred |
| Gruyère Cheese 🧀 | 1 cup | Shredded, aged 12+ months |
| Cream Cheese 🧈 | 8 oz | Full-fat, room temperature |
| Whole Milk 🥛 | 2 cups | Warm for best sauce |
| Heavy Whipping Cream 🥛 | ½ cup | Full-fat for richness |
| Unsalted Butter 🧈 | ½ cup | Cold, cubed for breading |
| Panko Breadcrumbs 🍞 | 1 ½ cups | Plain, not seasoned |
| Parmesan Cheese 🧀 | ½ cup | Freshly grated, fine |
| Garlic Powder 🧄 | 1 tbsp | Freshly ground preferred |
| Onion Powder 🧅 | 1 tsp | For depth of flavor |
| Ground Black Pepper 🌶️ | ½ tsp | Freshly cracked |
| Salt 🧂 | 1 ½ tsp | Kosher or sea salt |
| Mustard Powder 🌶️ | ½ tsp | For subtle tang |
| Dijon Mustard 🍯 | 1 tbsp | For sauce binding |
The cheeses are where this dish shines. Sharp cheddar brings the tang, while Gruyère adds that nutty depth—don't skimp on quality here. I always grab the block cheddar from the deli counter and shred it myself (pre-shredded gets gummy). For the Gruyère, Whole Foods or specialty cheese shops have the best aged varieties. The cream cheese? Full-fat, room temperature—trust me on this. And that Parmesan? Freshly grated from a wedge, not the canned stuff. It makes all the difference in that crispy topping.
No panko? Plain breadcrumbs toasted in the oven work in a pinch, but panko's lighter texture is key for that perfect crunch. Short on Gruyère? Add extra sharp cheddar plus a splash of milk to compensate. The mustard powder and Dijon mustard might sound odd, but they're secret weapons for binding the sauce and adding just enough tang. Trader Joe's has great affordable Gruyère and Dijon, and their breadcrumbs are my go-to for this recipe. If you're making this ahead, assemble everything except the breading and refrigerate overnight—the flavors meld beautifully.
This reheats like a dream—actually tastes better the next day once everything melds. Store leftovers covered in the fridge for 4-5 days, or freeze for 3 months (just add 10 minutes to baking time when reheating). I always make a double batch because it disappears fast. For extra crispiness, broil for 2-3 minutes at the end. And if you're serving a crowd, use a 9x13-inch baking dish—it holds its shape perfectly and feeds 8-10 comfortably.
Why You'll Love This Recipe
- One-Pan Wonder: I swear by this for lazy nights—just toss everything on a sheet pan, bake, and walk away. The macaroni gets perfectly coated in that golden, cheesy crust while staying creamy inside, and honestly? No extra pots to wash.
- Triple-Cheese Magic: Sharp cheddar brings the tang, Gruyère adds nutty depth, and cream cheese ties it all together like a hug. That crispy breaded top? It’s the kind of flavor that makes you reach for seconds without thinking.
- Leftovers That Don’t Suck: This actually tastes better the next day—yes, really. I meal prep it all the time because reheating it just melts the breading into gooey perfection, and it’s still a crowd-pleaser at potlucks or school lunches.
- Budget-Friendly Luxury: Elbow mac, a block of cheddar, and a few other pantry staples? This is comfort food that doesn’t break the bank. I’ll be real: it’s the kind of dish that makes fancier takeout feel pointless.
Step-by-step instructions for baked breaded mac and cheese
Here's how to create that perfect golden crust with a gooey, melty center - every time.
Cook the Elbow Macaroni Al Dente
Bring a large pot of water to a rolling boil and add 1.5 lb elbow macaroni. Salt the water generously - it should taste like the ocean. Cook the pasta until it's 1 minute shy of the package directions for al dente. This ensures it finishes cooking perfectly in the oven without becoming mushy.
Before draining, reserve 1 cup of pasta water - this starchy liquid is liquid gold for creating a silky sauce. Drain the pasta and immediately return it to the pot. Toss with 1 tbsp Dijon mustard and 1.5 tsp salt while still hot. This step prevents the pasta from drying out and adds subtle tang that balances the richness of the cheese.
Prepare the Ultimate Cheese Sauce
In a large bowl, combine 2 cups sharp white cheddar cheese, 1 cup Gruyère cheese, 8 oz cream cheese, and 0.5 cup heavy whipping cream. Microwave in 30-second bursts until the cream cheese melts completely - about 1 minute total. Stir until smooth, then add 2 cups warm whole milk and mix until fully incorporated.
Transfer the cheese mixture to a blender and blend until completely smooth. This eliminates any lumps and creates that ultra-creamy texture we're after. Pour the sauce over the hot macaroni and toss gently but thoroughly. The residual heat from the pasta will help the cheese melt perfectly into the strands. If the mixture seems too thick, add 1-2 tablespoons of reserved pasta water to reach your desired consistency.
Create the Crispy Breading Mixture
In a separate bowl, combine 1.5 cups panko breadcrumbs, 0.5 cup freshly grated Parmesan cheese, 1 tbsp garlic powder, 1 tsp onion powder, 0.5 tsp ground black pepper, and 0.5 tsp mustard powder. Mix well to distribute all the seasonings evenly. The panko should look dry but well-coated with all the spices.
Cut 0.5 cup cold unsalted butter into small cubes and mix into the breadcrumb mixture. Use your fingers to work the butter into the breadcrumbs until you have a crumbly, almost sandy texture. This butter will create the crispy crust we're after. If the mixture seems too dry, add 1-2 teaspoons of milk to help bind it together just enough to coat the macaroni.
Assemble and Bake to Golden Perfection
Preheat your oven to 375°F and grease a 9x13-inch baking dish generously with butter or oil. Spread the macaroni mixture evenly into the baking dish, then sprinkle the breadcrumb mixture evenly over the top. Press down gently but firmly to ensure good contact with the cheese - this creates that perfect crispy crust.
Bake for 25 minutes until the top is deep golden brown and the edges are bubbling. For the final 5 minutes, increase the oven temperature to 425°F to get that extra-crispy finish. The center should still be slightly jiggly when you remove it from the oven - this indicates the perfect pull-apart texture. Let it rest for 5 minutes before serving to allow the juices to redistribute.
Serve Immediately for Maximum Crispiness
Slice through the crispy crust with a sharp knife, being careful not to cut all the way through to the bottom. The cheese should be gooey and stretchy when pulled apart. Serve immediately while the crust is at its crispiest - this dish doesn't wait well. For extra presentation, garnish with additional Parmesan cheese and a sprinkle of fresh cracked black pepper. Each bite should deliver that perfect combination of crispy, creamy, and cheesy magic.
Pro Tips For Making Baked Breaded Mac And Cheese
- COOK PASTA AL DENTE: I learned this the hard way—overcooked macaroni turns to mush when baked, no matter how much cheese you add. Pull elbows when they’re still slightly firm (about 1 minute less than package instructions) so they hold shape under the breading.
- GRATE CHEESE FINE: Skip the food processor unless you want gritty texture. Use a box grater for sharp cheddar and Gruyère, then hand-stir in cream cheese last—it melts faster and keeps the sauce smooth. (Yes, even if you’re impatient like me.)
- BREAD EARLY, BAKE LATE: Toss the mac and cheese with breadcrumbs before baking, not after. The crumbs stick better and toast evenly—just give it a quick stir to coat. If you wait until the end, you’ll end up with dry, sad bits on top.
- USE A WATER BATH: Place your baking dish in a roasting pan with 1 inch of hot water first. The steam guarantees a creamy interior while the breading crisps—no soggy middle, no guessing oven temps. (Your future self will thank you.)
Best sauces and condiments for this recipe
Classic Cheese Sauce
This rich, velvety sauce is the heart of your dish. I recommend adding a splash of 1 tbsp lemon juice or white wine to brighten the flavors before blending. For extra creaminess, stir in 2 tbsp sour cream at the end—it adds a subtle tang that balances the richness.
The key is patience: let the sauce sit for 5 minutes off the heat before mixing with pasta, allowing the cheese to fully melt and create that signature stretch. 🧀
Spicy Sriracha Mayo
For a kick, mix ¼ cup mayonnaise with 1 tbsp sriracha and ½ tsp smoked paprika. Drizzle this over individual portions before serving—it cuts through the richness while adding heat.
I like to add a pinch of garlic powder for depth. This works especially well if you're serving this as an appetizer or game-day snack. 🌶️
Smoky BBQ Glaze
Simmer ½ cup ketchup, 2 tbsp apple cider vinegar, 1 tbsp brown sugar, and 1 tsp smoked paprika for 5 minutes> until thickened. Brush this glaze over the top of the baked mac and cheese during the final 5 minutes> of baking at 425°F.
The caramelization adds a sweet-savory contrast that's perfect for a main dish. 🔥
Herb Butter Drizzle
Melt 2 tbsp unsalted butter with 1 tsp chopped chives, ½ tsp dried thyme, and a pinch of salt. Drizzle this over the finished dish just before serving—it adds a fresh, herby note that elevates the cheesy flavors without overpowering them.
I often use this for a lighter, more sophisticated presentation. 🌿
Garlic Parmesan Crust
For a flavor-packed alternative to the breadcrumb topping, mix ½ cup panko with 2 tbsp grated Parmesan, 1 tsp minced garlic, and ½ tsp Italian seasoning. Press this onto the top of the mac and cheese before baking.
The garlic infuses into the crust, creating a fragrant, savory layer that pairs perfectly with the creamy center. 🧄
Honey Mustard Swirl
Combine 2 tbsp Dijon mustard with 1 tbsp honey and 1 tsp apple cider vinegar. After baking, swirl this mixture through the mac and cheese using a spoon before serving.
The sweetness of the honey balances the tangy mustard, adding a bright, complex flavor that's especially good for a brunch dish. 🍯
Nutrition facts
Frequently asked questions
Can I make this ahead of time?
Assemble everything except the breadcrumb topping and refrigerate for up to 24 hours. When ready to bake, add the breadcrumbs and bake as directed. The flavors actually improve overnight, and the crust will be even crispier. For freezing, assemble completely (including breading), cover tightly, and freeze for up to 3 months. Thaw overnight in the fridge before baking.
Why is my breadcrumb topping not crispy? There are 3 common culprits: insufficient butter in the breading, underbaking, or not pressing the topping down firmly.
What's the best pasta shape for this?
Elbow macaroni is ideal because its shape holds the cheese sauce beautifully and creates those delicious pockets of melty goodness. However, you can use cavatappi or fusilli in a pinch—they both trap sauce well. Avoid long, thin pastas like spaghetti or linguine as they won't hold together as nicely when baked. The key is medium or jumbo size for maximum surface area to absorb the cheese sauce.
Can I make this vegetarian?
This recipe is already vegetarian! All the ingredients are plant-based friendly. For extra richness, consider adding vegan cream cheese and vegan butter to the breading. The flavor and texture will be identical to the original. Just ensure your cheddar and Gruyère are labeled vegetarian (most are, but always check). The same technique works perfectly for vegan diets.
How do I reheat leftovers?
For best results, cover with foil and reheat in a 350°F oven for 15-20 minutes until warmed through. The crust will soften slightly but still be delicious. For microwave reheating, cover with a damp paper towel and heat in 30-second intervals, stirring between each, until hot. Add a splash of milk to restore creaminess if needed. Leftovers actually taste better the next day!