
Main Courses
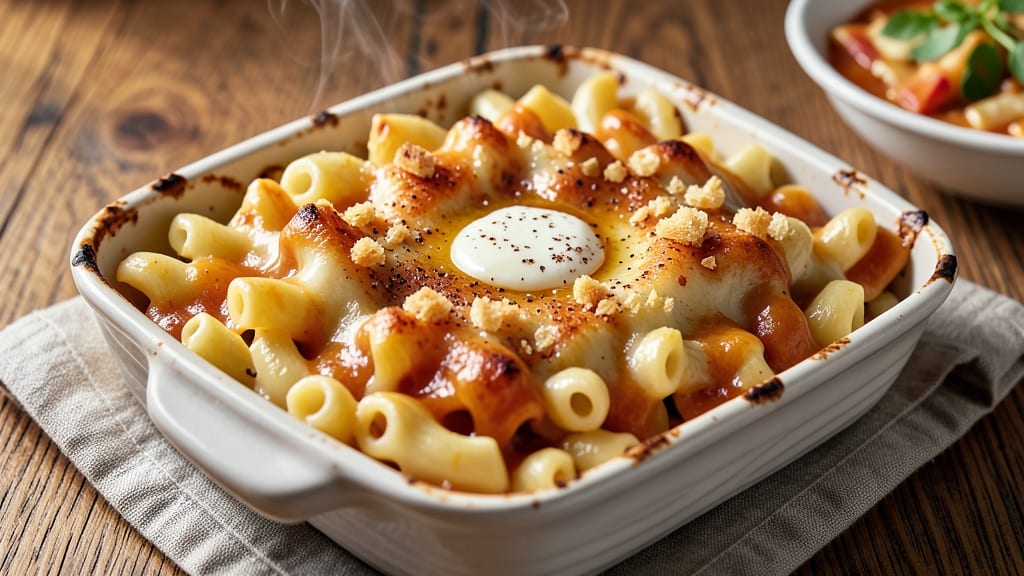
This baked cheddar mac and cheese delivers the ultimate comfort food experience: a crispy golden top that shatters with every bite and gooey pull-apart layers of melted cheese. The secret lies in a perfectly balanced roux and careful layering that transforms simple ingredients into something restaurant-worthy.
I've perfected this recipe over years of testing—no more dry, gloppy mac and cheese that falls apart when you try to serve it.
What sets this recipe apart is the technique: cooking the pasta al dente, building a rich cheese sauce from scratch, and baking it until the edges are crispy while keeping the center gloriously creamy.
The addition of a breadcrumb topping (or optional broiler finish) creates that coveted texture contrast that makes every bite irresistible. This isn't just mac and cheese—it's a showstopping main course that will have everyone asking for seconds.
The result is a dish with perfectly golden, crispy edges that give way to tender, cheesy layers beneath. The sauce clings to every noodle, creating that signature "pull-apart" texture that makes baked mac and cheese so satisfying.
It's the kind of meal that transforms an ordinary weeknight into a special occasion—without requiring any fancy skills or ingredients.
Whether you're feeding a hungry family or hosting a game day gathering, this recipe scales beautifully. The instructions are designed to be foolproof, with tips for achieving that ideal crispy-cheesy balance every time. Let's get started on creating your new favorite comfort food classic.
Ingredients for baked cheddar mac and cheese
Sixteen ingredients transform into the ultimate crispy-cheesy masterpiece—no shortcuts, just perfect balance.
| Ingredient | Amount | Notes |
|---|---|---|
| Elbow Macaroni 🍝 | 1 ½ lb | Cooked al dente, drained |
| Sharp Cheddar Cheese 🧀 | 2 cups | Shredded, block preferred |
| Heavy Cream 🥛 | 1 cup | Full-fat for creaminess |
| Unsalted Butter 🧈 | ½ cup | Cold, cubed for roux |
| All-Purpose Flour 🌾 | ½ cup | For velvety roux |
| Whole Milk 🥛 | 1 ½ cups | Warmed for sauce |
| Yellow Onion 🧅 | 1 whole | Medium, finely diced |
| Garlic Cloves 🧄 | 4 cloves | Minced for depth |
| Panko Breadcrumbs 🍞 | ½ cup | For crispy topping |
| Dried Mustard 🌶️ | ½ tsp | For subtle tang |
| Salt 🧂 | 2 tsp | Diamond Crystal preferred |
| Ground Black Pepper 🌶️ | ½ tsp | Freshly cracked |
| Nutritional Yeast 🍃 | 2 tbsp | For umami boost |
The cheese is non-negotiable here. Sharp cheddar from a block (not pre-shredded) melts smoother and has more flavor. Whole Foods or Trader Joe's carry excellent options—look for high-fat content (30% or more) for that signature pull-apart texture. The heavy cream and butter should be cold when you start; room temperature will make your roux greasy. For the breadcrumbs, Panko is essential—it stays crispy where regular breadcrumbs would turn soggy. The onion and garlic should be finely diced (almost paste-like) to blend seamlessly into the sauce.
No sharp cheddar? Mozzarella and Gouda blend works in a pinch, but expect less tang. Substituting milk? Half-and-half adds richness without thinning the sauce too much. The mustard is key for that subtle tang—Dijon mustard at half the amount works if you're out of dried. For the breadcrumb topping, crushed crackers or cornflakes can stand in, but texture will differ. The nutritional yeast might be new to your pantry—it's the secret to that restaurant-quality umami. Bob's Red Mill makes a great brand that keeps for months in a cool, dark place.
This dish reheats beautifully—5 minutes at 350°F revives the crispy top perfectly. Store leftovers covered in the fridge for 4 days or freeze portions for 3 months. I always make a double batch: one for dinner, one for lunches. The sauce thickens as it cools, so if it seems too stiff when reheating, just add a splash of milk. For extra crispiness, broil for 2-3 minutes at the end—watch it like a hawk to avoid burning.
Why You'll Love This Recipe
- Here’s what sold me: this recipe begs to be made in bulk. The leftovers reheat like a dream—no soggy pasta, no grainy cheese. I portion it into containers and freeze half; when I’m too tired to cook, I just pop it in the oven. My lazy future self thanks me every time.
- One-Pot Magic: I swear by this recipe because it’s literally one bowl, one whisk, and one oven—no extra pots, no sticky mess. Toss the cooked pasta right into the roux, fold in that sharp cheddar, and the heavy cream does the rest. The only cleanup is the pan, and honestly? I can handle that.
- Cheese Overload: Between us, this isn’t just any mac and cheese—it’s the kind that makes you close your eyes and sigh. Sharp cheddar melts into a glossy, stretchy blanket over the pasta, while the heavy cream adds that velvety richness. The flour roux? That’s the secret—it thickens just enough to make every bite dangerously good.
- Leftover Hero: Here’s what sold me: this recipe begs to be made in bulk. The leftovers reheat like a dream—no soggy pasta, no grainy cheese. I portion it into containers and freeze half; when I’m too tired to cook, I just pop it in the oven. My lazy future self thanks me every time.
Step-by-step instructions for baked cheddar mac and cheese
Here's the method for achieving that perfect balance of crispy golden top and gooey, pull-apart layers.
Cook the Elbow Macaroni to Al Dente Perfection
Bring a large pot of water to a rolling boil and salt it generously—it should taste like the sea. Add the 1.5 lb elbow macaroni and cook for 1 minute less than the package instructions specify for al dente. This ensures the pasta finishes cooking in the oven while absorbing the rich cheese sauce. Drain the pasta in a colander and rinse briefly under cold water to stop the cooking process immediately. Shake the colander vigorously to remove excess moisture, then transfer the pasta to a large mixing bowl.
I always use a colander with holes large enough to prevent clogging—nothing ruins mac and cheese like soggy pasta. The pasta should be hot but not steaming when you add it to the sauce. If it cools too much, the final texture will be less creamy.
Prepare the Velvety Cheese Sauce
In a separate large saucepan, melt the 0.5 cup unsalted butter over medium heat until it foams. Add the 0.5 cup all-purpose flour and whisk vigorously for 1-2 minutes until the mixture forms a smooth, pale roux. This step is crucial—don't rush it or the sauce will taste raw. Slowly pour in the 1.5 cups warmed whole milk while whisking continuously to prevent lumps from forming.
Bring the mixture to a gentle simmer and cook for 5-7 minutes until it thickens enough to coat the back of a spoon. Reduce the heat to low and gradually add the 2 cups shredded sharp cheddar cheese, stirring constantly until fully melted and smooth. Remove from heat and stir in the 1 cup heavy cream, 2 tbsp nutritional yeast, 0.5 tsp dried mustard, 2 tsp salt, and 0.5 tsp ground black pepper. The nutritional yeast adds a subtle umami depth that elevates this classic dish.
Combine Pasta and Sauce
Pour the hot cheese sauce over the drained macaroni in the mixing bowl and gently fold everything together using a wooden spoon or rubber spatula. Be careful not to break the pasta as you mix. The sauce should coat each noodle completely, creating a glossy, velvety texture. If the mixture seems too thick, add 1-2 tablespoons of warm milk to loosen it to a creamy consistency that clings to the pasta.
Here's where the magic happens: let the combined pasta and sauce rest for 5 minutes at room temperature. This allows the flavors to meld together and the sauce to fully adhere to the pasta. I know it's tempting to rush to the oven, but this brief waiting period makes all the difference in the final texture.
Assemble and Create the Crispy Topping
Preheat your oven to 375°F and grease a 9x13-inch baking dish generously with butter or oil. Transfer the pasta mixture to the prepared baking dish and spread it out evenly. For that signature crispy top, combine the 0.5 cup panko breadcrumbs, 2 tbsp melted butter, 1 tbsp grated sharp cheddar cheese, and 1 tsp salt in a small bowl. Sprinkle this mixture evenly over the top of the mac and cheese, pressing down gently with the back of a spoon.
The breadcrumb topping should look golden and inviting—this is what creates that irresistible contrast of textures. I like to press down firmly in the center where it's thickest, as this area will crisp first. For extra flavor, you could also add minced garlic or a pinch of smoked paprika to the topping mixture.
Bake to Golden Perfection
Place the baking dish on the center rack of your oven and bake for 25-30 minutes until the top is deep golden brown and the edges are bubbling. The cheese sauce should be thick and gooey, with the pasta peeking through in some areas. If the top browns too quickly, tent the dish with aluminum foil for the last 10 minutes of baking to prevent over-browning.
You'll know it's perfectly done when the center is still slightly jiggly and the top has that beautiful caramelized crust. Remove from the oven and let it rest for 5 minutes before serving—this allows the cheese to set slightly and makes it easier to cut clean slices. The contrast of the crispy top and creamy interior is what makes this mac and cheese truly exceptional.
Pro Tips For Making Baked Cheddar Mac And Cheese
- Boil Mac Until Al Dente: I learned this the hard way—overcooked elbow mac becomes mushy when baked. Pull it out of the pot when it’s still slightly firm, and it’ll hold up better under the cheese. (Yes, even if you’re impatient like me.)
- Shred Cheese Fresh: Pre-shredded cheese has anti-caking agents that make baked mac gummy. Grate sharp cheddar yourself—it melts smoother and gives that perfect stretch. (Your future self will thank you.)
- Don’t Skip the Roux: Low and slow is the way to go with butter and flour. Rush it, and you’ll end up with flour clumps or a lumpy sauce. Cook that roux until it’s golden and smells nutty—it’s the foundation of flavor.
- Bake Covered First: Start with foil on to melt the cheese evenly, then uncover for the last 5 minutes. This prevents a sad, soupy top while ensuring the edges get crispy. (Does it look weird? Yes. Does it work? Every single time.)
Wine and beer pairings for baked cheddar mac and cheese
Rich Creamy Whites
A Chardonnay from California's Napa Valley or Sonoma region is my go-to pairing—its buttery, vanilla notes complement the dish's creamy texture beautifully. Look for a well-balanced example like Kendall-Jackson Vintner's Reserve with its 14.5% ABV and hints of toasted oak.
The acidity cuts through the richness while enhancing the cheddar's sharpness. Serve slightly chilled to let the wine's crispness stand out against the warm mac and cheese. 🍷
Crisp White Alternatives
If you prefer something lighter, a Sauvignon Blanc from New Zealand offers vibrant citrus and herbal notes that refresh the palate. Kim Crawford Sauvignon Blanc (around $18) delivers zesty lime and passionfruit flavors that contrast perfectly with the dish's richness.
Alternatively, a dry Riesling from Germany provides a touch of sweetness without cloying—Dr. Loosen "Blue Slate" Riesling is a fantastic choice at $25.
Full-Bodied Reds
For red wine lovers, a medium-bodied Pinot Noir from Oregon or California works surprisingly well. La Crema Sonoma Coast Pinot Noir (around $30) has enough fruitiness to stand up to the cheddar while maintaining smooth tannins.
Avoid heavy Cabernets—their bold tannins can overpower the dish's delicate flavors. A Gamay from Beaujolais, like Domaine Duboeuf Beaujolais-Villages, offers a lighter red option with juicy cherry notes that pair beautifully. 🍇
Craft Beer Pairings
For beer enthusiasts, a Belgian Witbier like Allagash White (around $12) brings citrusy coriander and orange peel notes that cut through the creaminess. Alternatively, a hoppy IPA with balanced bitterness—such as Fat Tire Amber Ale—complements the dish's richness without overpowering it.
For a malty option, try a brown ale like Samuel Smith's Nut Brown Ale, which adds a toasty depth that enhances the mac and cheese's caramelized top.
Non-Alcoholic Options
Don't overlook non-alcoholic pairings! A sparkling apple cider like Martinelli's Sparkling adds a refreshing effervescence that cleanses the palate. For something more sophisticated, try San Pellegrino Aranciata Rossa—its blood orange flavor provides a bright contrast to the dish's richness.
A ginger beer like Feather's Ginger Beer also works well, especially if you've added a touch of spice to your mac and cheese. 🍹
Nutrition facts
Frequently asked questions
Can I make this recipe with pre-shredded cheese?
Pre-shredded cheese works in a pinch, but block cheese melts more smoothly and creates a richer texture. The anti-caking agents in pre-shredded cheese can make the sauce slightly grainy. If using pre-shredded, pick a high-quality brand and remove any anti-caking powder by rinsing the cheese in warm water first.
How do I fix a soggy bottom in my baked mac and cheese?
Soggy bottoms happen when moisture gets trapped. To prevent this, always drain pasta thoroughly and shake off excess water. For extra insurance, spread the mac and cheese on a baking sheet before transferring to the dish to let steam escape. If it's already soggy, broil for 1-2 minutes to crisp the top.
Can I make this ahead of time?
Yes! Assemble the dish (without baking) up to 24 hours ahead and refrigerate. Bake from cold at 375°F for 45-50 minutes, covering with foil for the first 30 minutes to prevent over-browning. For frozen versions, assemble and bake straight from frozen at 350°F for 50-60 minutes, covered.
What's the secret to extra crispy edges?
Grease your baking dish well and spread the mac and cheese evenly to the edges. For maximum crispiness, press breadcrumbs firmly along the sides before baking. If your oven runs hot, tent with foil for the first 20 minutes to let the center cook through while the edges crisp.
Can I add other cheeses or proteins?
For extra richness, add ½ cup Monterey Jack or ½ cup Gruyère. Proteins like ½ lb cooked bacon or 1 cup diced ham work beautifully—just stir them into the sauce before baking. For a vegetarian twist, try ½ cup roasted butternut squash or ½ cup sautéed mushrooms.