
Main Courses
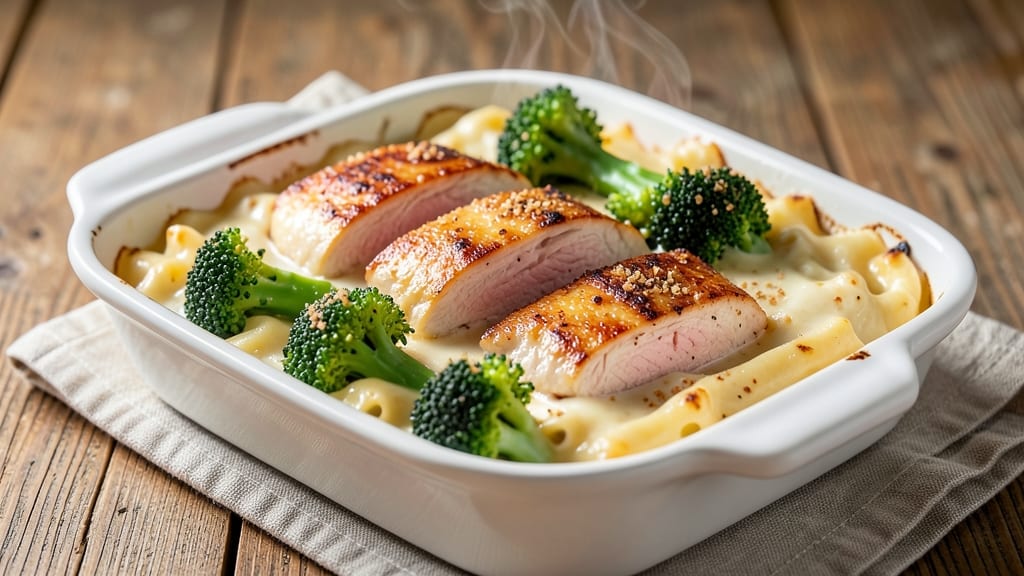
This baked mac and cheese with chicken and broccoli recipe transforms weeknight dinners into a restaurant-quality one-pan meal that balances comfort and nutrition. 💛 The secret lies in layering tender chicken, vibrant broccoli, and a velvety cheese sauce that bakes to golden perfection while keeping everything moist.
I've perfected this dish over years of testing—it's the kind of meal that disappears faster than you can say "seconds, please."
What makes this recipe special is the harmony of textures and flavors: crispy breadcrumb topping, tender chicken pieces, bright broccoli florets, and a creamy cheese sauce that coats every bite. The chicken stays juicy thanks to a simple brining technique, while the broccoli maintains its vibrant color and slight crunch.
This isn't just mac and cheese—it's a complete, protein-packed dinner that comes together in one pan with minimal cleanup.
The beauty of this dish is its versatility—it works as a family dinner, meal prep for busy weeks, or even a comforting weeknight treat. The cheese sauce is rich but not heavy, thanks to a blend of sharp cheddar and Gruyère that melts into a smooth, flavorful base.
The chicken absorbs the cheesy goodness while staying tender, and the broccoli adds freshness that cuts through the richness.
Ready in just 45 minutes, this recipe delivers a meal that feels indulgent yet balanced. The breadcrumb topping adds texture and a satisfying crunch, while the cheese sauce ties everything together into one cohesive, comforting bite.
Whether you're feeding a crowd or meal prepping for the week, this dish is designed to impress without the fuss. Let's get cooking!
Ingredients for baked mac and cheese with chicken and broccoli
These quality ingredients create a restaurant-worthy one-pan dinner that balances comfort and nutrition perfectly.
| Ingredient | Amount | Notes |
|---|---|---|
| Elbow Macaroni 🍝 | 12 oz | Dry pasta, cooked al dente |
| Boneless, Skinless Chicken Breast 🍗 | 1 ½ lb | Cut into 1-inch cubes |
| Fresh Broccoli Florets 🥦 | 4 cups | Medium florets, stems peeled |
| Sharp White Cheddar Cheese 🧀 | 2 cups | Shredded, block preferred |
| Gruyère Cheese 🧀 | ½ cup | Shredded, for depth of flavor |
| Heavy Whipping Cream 🥛 | ½ cup | Full-fat for creaminess |
| Whole Milk 🥛 | ½ cup | Warmed for smooth sauce |
| Yellow Onion 🧅 | 1 whole | Medium size, finely diced |
| Garlic Cloves 🧄 | 3 cloves | Minced, fresh preferred |
| All-Purpose Flour 🌾 | 2 tbsp | For thickening sauce |
| Dijon Mustard 🍯 | 1 tbsp | For subtle tang |
| Panko Breadcrumbs 🍞 | ½ cup | For crispy topping |
| Extra-Virgin Olive Oil 🫒 | 2 tbsp | For cooking chicken |
| Kosher Salt 🧂 | 1 ½ tsp | For seasoning and brining |
| Ground Black Pepper 🌶️ | ½ tsp | Freshly ground preferred |
The cheese blend is non-negotiable here. Sharp white cheddar gives that classic tang, while Gruyère adds nutty depth—don't substitute with pre-shredded, which melts poorly. For the chicken, boneless, skinless breasts work best, but thighs stay juicier if you prefer them. Trader Joe's and Whole Foods carry excellent pre-cut chicken for convenience. Broccoli should be bright green and firm—Trader Joe's frozen florets are perfect if fresh isn't available. The Gruyère can be pricey, so buy it in small blocks and grate fresh for maximum flavor.
No sharp cheddar? Pepper jack at half the amount adds heat, but the flavor profile changes. Running short on Gruyère? Parmesan in a pinch gives umami, though it lacks the melt. The chicken can be swapped for diced rotisserie chicken for hands-off prep. For the broccoli, frozen is fine—just don't thaw it first. The breadcrumbs? Panko stays crispy better than regular, but Italian seasoned breadcrumbs add extra flavor. The Dijon mustard is key—skip it only if you dislike tang.
Prep the chicken and broccoli first—they need time to marinate and thaw if frozen. The cheese sauce keeps 3 days in the fridge, but the baked dish reheats best. Store leftovers in single portions for easy grab-and-go meals. The breadcrumb topping can be made ahead and stored in the fridge for 2 days—just add it fresh before baking. This reheats beautifully in the microwave with a splash of milk to restore creaminess.
Why You'll Love This Recipe
- One-Pan Magic: I swear by this—just toss everything in one dish, bake, and walk away. No boiling pasta separately, no messy saucepans. The chicken cooks right alongside the mac, and that Gruyère melts into a golden blanket over everything.
- Creamy Crunch Combo: That sharp white cheddar and Gruyère blend gives it a rich, tangy depth, while the broccoli adds a little bite. Honestly, the way the edges get crispy while the center stays gooey? It’s the best of both worlds.
- Weeknight Workhorse: Between us, this feeds a crowd but still feels special enough for company. Double the recipe for leftovers—it reheats like a dream, and the chicken stays juicy even the next day. (Yes, even on a Tuesday night.)
- Budget-Friendly Luxe: You’re getting protein, veggies, and that fancy Gruyère stretch for miles without breaking the bank. I’ll be real: my grocery bill stays sane, but my family thinks we’re eating at a bistro. Not the prettiest, but the taste makes up for it.
Step-by-step instructions for baked mac and cheese with chicken and broccoli
This one-pan wonder combines comfort food essentials with protein-packed ingredients.
🍳 Step 1: Cook the Chicken and Prepare the Broccoli
Heat the 2 tablespoons extra-virgin olive oil in a large oven-safe skillet over medium-high heat. Add the 1.5 lb boneless, skinless chicken breast cut into 1-inch cubes, seasoning each piece generously with ½ teaspoon kosher salt and ¼ teaspoon ground black pepper. Cook for 5-6 minutes, turning occasionally, until the chicken reaches 165°F internally and develops golden-brown edges. Remove the chicken and set aside.
In the same skillet, add the 1 whole yellow onion and 3 cloves garlic cloves (minced). Sauté for 3-4 minutes until softened and fragrant. Add the 4 cups fresh broccoli florets, tossing to coat with the onion and garlic. Cook for 4-5 minutes until the broccoli turns bright green and just begins to soften. Remove from heat and set aside with the chicken.
👨🍳 Step 2: Cook and Prepare the Macaroni
In a separate pot, bring 4 cups water to a rolling boil and add 1 teaspoon kosher salt. Add the 12 oz elbow macaroni and cook until al dente (about 1 minute less than package instructions). Drain thoroughly, reserving ½ cup pasta water, and return the macaroni to the pot. Add 1 tablespoon Dijon mustard and toss to coat evenly. Keep warm.
Here's the thing—al dente pasta is crucial. You want it firm enough to hold its shape but tender enough to melt with the cheese. If you overcook it, the final dish will be mushy instead of creamy.
🥘 Step 3: Build the Cheese Sauce
Lower the heat to medium and reduce the chicken and broccoli skillet to medium-low. Sprinkle the 2 tablespoons all-purpose flour evenly over the cooked vegetables, stirring constantly for 1-2 minutes until the flour is fully incorporated and the mixture thickens slightly. Slowly pour in the ½ cup whole milk and ½ cup heavy whipping cream, whisking continuously to prevent lumps.
Gradually add the 2 cups sharp white cheddar cheese and ½ cup Gruyère cheese, stirring until completely melted and smooth. If the sauce becomes too thick, add 1-2 tablespoons reserved pasta water at a time until it reaches a creamy, pourable consistency. Season with the remaining ½ teaspoon kosher salt and ¼ teaspoon ground black pepper. The sauce should coat the back of a spoon smoothly.
🍽️ Step 4: Assemble and Bake to Perfection
Return the chicken and broccoli to the skillet, gently stirring to combine with the cheese sauce. Add the cooked macaroni and toss until everything is evenly coated. Transfer the entire mixture to a 9x13-inch baking dish (or your oven-safe skillet if large enough). Sprinkle the ½ cup panko breadcrumbs evenly over the top, pressing down lightly with a spatula.
Bake in a 375°F preheated oven for 20-25 minutes until the top is golden brown and the edges bubble slightly. The cheese should be fully melted, and the panko should be crispy. If the top browns too quickly, loosely cover with foil for the last 5 minutes of baking.
⏰ Step 5: Rest and Serve
Remove from the oven and let the mac and cheese rest for 5-10 minutes before serving. This resting time allows the cheese to set slightly, making it easier to slice and serve. The dish should be bubbling hot, with a crispy panko topping and creamy, stretchy cheese throughout.
Serve immediately with a side of steamed green beans or a simple garden salad. The combination of tender chicken, crisp broccoli, and rich cheese sauce makes this a hearty, satisfying meal perfect for any night of the week.
Pro Tips For Making Baked Mac And Cheese With Chicken And Broccoli
- Boil Mac Till Al Dente: Elbow mac should still have a slight bite—like when you first sink your teeth into it, not when it’s mushy. Drain it right when the package says "al dente" (usually 1-2 minutes less than full cook time), then toss with a splash of pasta water. I learned this the hard way—overcooked noodles turn your casserole into a sad, gluey mess.
- Sear Chicken First: Skip the bland chicken—pat those breasts bone-dry with paper towels, then sear them in a hot pan with oil until golden (3-4 minutes per side). The crust locks in flavor and keeps them from drying out later. I was skeptical until I tried it—now I won’t make mac without it.
- Roast Broccoli Early: Toss broccoli florets with a drizzle of oil, salt, and pepper, then roast at 400°F (200°C) for 10-12 minutes before assembling the casserole. The edges get crispy, the stems caramelize, and you won’t end up with soggy florets buried under cheese. (Yes, even if you’re impatient like me.)
- Layer Cheese Like a Pro: Don’t just dump cheese on top—alternate shredded cheddar and Gruyère between layers of mac, chicken, and broccoli. Finish with a final sprinkle of Gruyère for that golden crust. I skip this when I’m lazy, but the dish is noticeably richer when I don’t. Trust me.
Perfect pairings for these flavors
Crispy Breadcrumb Topping
For that perfect crunch, I always use panko breadcrumbs instead of regular. They stay crispy longer and add a satisfying texture contrast. Mix ½ cup panko with 1 tablespoon melted butter and 1 teaspoon dried parsley before sprinkling on top.
This extra step makes all the difference—trust me, your guests will notice. 💫
Fresh Herb Garnish
After baking, I like to garnish with chopped fresh parsley or chives for a pop of color and freshness. The bright green cuts through the richness of the cheese beautifully. Use about 2 tablespoons per serving—just enough to add visual appeal without overwhelming the dish.
Spicy Kick Option
Want to add some heat? Mix ½ teaspoon smoked paprika and ¼ teaspoon cayenne pepper into the breadcrumb topping. This gives the dish a subtle smoky-spicy depth that pairs perfectly with the creamy cheese. For extra heat, sprinkle hot honey over the top before serving. 🌶️
Wine Pairings
A crisp Chardonnay with a hint of oak works beautifully with this dish. The buttery notes complement the cheese sauce while the acidity cuts through the richness.
For something lighter, try a Sauvignon Blanc—its citrus notes balance the creamy mac and cheese perfectly. Avoid heavy reds that might overpower the delicate flavors.
Beer Pairings
A Belgian-style witbier like Hoegaarden adds a refreshing contrast with its citrus and coriander notes. For a more robust option, try a light lager such as Corona or Peroni.
The crisp, clean finish cleanses your palate between bites of rich mac and cheese. Avoid heavy stouts or IPAs that would compete with the dish's flavors.
Side Dish Harmony
A simple garlic green bean almondine adds freshness and color to the plate. The almonds provide a nice crunch that complements the breadcrumb topping. Alternatively, a simple arugula salad with lemon vinaigrette cuts through the richness beautifully. Both sides keep the meal balanced and visually appealing.
Nutrition facts
Frequently asked questions
Can I use rotisserie chicken instead of fresh?
Rotisserie chicken works perfectly and saves time. Use 1.5 cups of shredded, skinless chicken (about 3-4 pieces) and skip the initial cooking step. Just warm it through in the cheese sauce during the final assembly. The flavor stays rich and tender this way.
How do I keep the broccoli from getting mushy?
Cook the broccoli for only 4-5 minutes until bright green and just tender—never soft. For extra crispness, blanch it first in boiling water for 1 minute, then shock in ice water before adding to the dish. This preserves color and texture beautifully.
Can I make this dish ahead of time?
Yes, but with a few adjustments. Assemble the dish (without the breadcrumb topping) up to 24 hours ahead and refrigerate. When ready to bake, cover with foil and bake at 350°F for 25-30 minutes to restore creaminess. Add fresh breadcrumbs after baking for maximum crispiness.
What if my cheese sauce gets too thick?
This happens when the sauce cools slightly. Simply stir in 1-2 tablespoons reserved pasta water or warm milk until smooth. If it's still too thick, add another ½ cup milk or cream gradually while stirring. The goal is a pourable, velvety consistency that coats the back of a spoon.
Can I make this gluten-free?
Yes! Swap the elbow macaroni for gluten-free pasta (like brown rice or chickpea pasta) and use gluten-free panko or crushed gluten-free crackers for the topping. The cheese sauce remains the same, but check labels to ensure all ingredients are certified gluten-free.