
Desserts
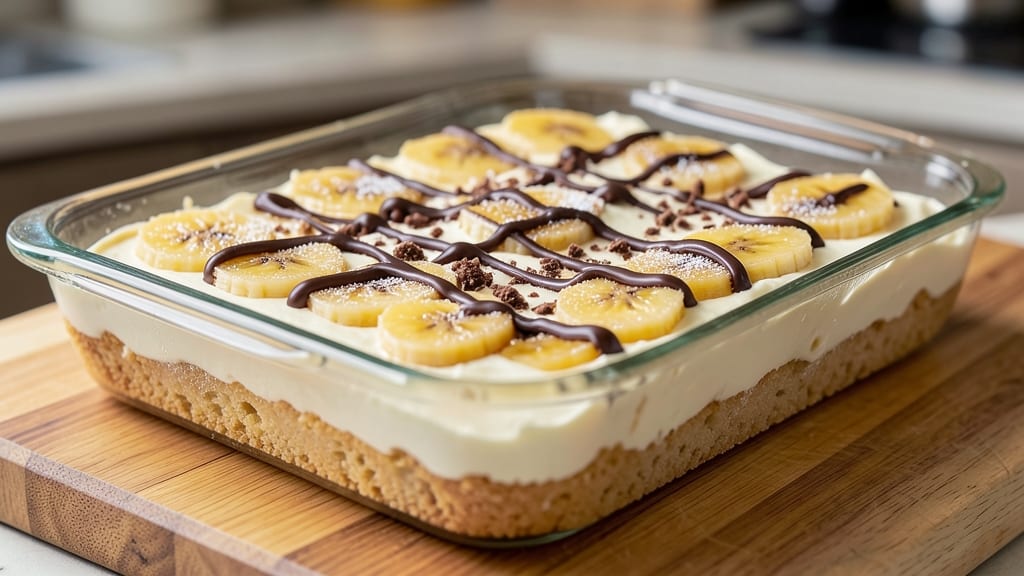
This banana cream cheese bars recipe delivers the perfect balance of creamy, tangy cheesecake layers and sweet banana swirls in every bite. The secret lies in baking two distinct layers separately—one rich with cream cheese and butter, the other packed with ripe banana puree—then swirling them together before chilling.
I’ve perfected this technique to ensure no soggy bottoms or cracked tops, just tender, velvety bars that taste like a cross between a cheesecake and banana pudding.
The process is straightforward but requires patience: a 350°F oven, 30 minutes of baking time, and at least 4 hours of chilling for the layers to set properly. The cream cheese layer stays soft and fudgy, while the banana layer adds natural sweetness and moisture without overpowering the tang.
For extra texture, you can fold in crushed cookies or chopped nuts into the cheese layer, or press chocolate chips into the top before chilling.
What makes these bars truly special is how they satisfy two cravings at once—the rich, creamy indulgence of cheesecake and the nostalgic comfort of banana.
They’re ideal for potlucks, holiday desserts, or a spontaneous treat, and they keep well in the fridge for up to 5 days or can be frozen for 2 months.
The key to success is letting the bars rest fully before slicing, so the layers hold their shape and flavors meld beautifully.
For a vegetarian-friendly version, ensure your cream cheese and butter are dairy-based (most are), and you can even make this gluten-free by using a GF flour blend in the crust if desired.
The recipe scales easily, so double the batch for gatherings—just be sure to use a 9x13-inch pan for the perfect portion size. Let’s get baking!
Ingredients for banana cream cheese bars
Simple, creamy layers and ripe banana swirls create the perfect dessert balance.
| Ingredient | Amount | Notes |
|---|---|---|
| All-Purpose Flour 🌾 | 1 ½ cups | Sifted for even texture |
| Granulated Sugar 🍚 | 1 cup | White or light brown |
| Unsalted Butter 🧈 | ¾ cup | Cold, cubed for crust |
| Cream Cheese 🧀 | 8 oz | Full-fat, room temperature |
| Large Eggs 🥚 | 2 whole | Room temperature |
| Vanilla Extract 🌿 | 1 tsp | Pure vanilla preferred |
| Baking Powder 🧂 | 1 tsp | Aluminum-free preferred |
| Salt 🧂 | ½ tsp | Fine sea salt |
| Ripe Bananas 🍌 | 2 cups | Mashed, about 3 medium |
| Powdered Sugar 🍚 | ½ cup | For banana layer |
| Lemon Juice 🍋 | 1 tbsp | Freshly squeezed |
| Mini Chocolate Chips 🍫 | ½ cup | Optional for topping |
| Chopped Walnuts 🌰 | ¼ cup | Optional for texture |
The cream cheese is the heart of these bars, so Philadelphia brand or similar is ideal—it melts smoothly without graininess. For the crust, King Arthur flour or Bob's Red Mill ensures a tender base. Bananas? Spotty and soft is perfect—overripe means sweeter, less mushy texture. If your butter feels warm, chill it 10 minutes before mixing. The powdered sugar in the banana layer keeps it stable during chilling, preventing that dreaded banana pudding sink. For extra richness, swap half the all-purpose flour with cake flour.
No vanilla extract? Vanilla bean paste works beautifully, or use 1 tsp vanilla sugar if you're in a pinch. Short on powdered sugar? Granulated sugar in a food processor does the trick—just pulse briefly. The chocolate chips and walnuts are optional, but Trader Joe's mini chips or Costco walnuts add that restaurant-quality touch. For a gluten-free version, use a 1:1 GF flour blend like Bob's Red Mill. The lemon juice brightens the banana flavor—skip it if you prefer pure sweetness, but I always include it for balance.
These bars need 4+ hours to set properly, so plan ahead. Store in an airtight container with parchment between layers for 5 days in the fridge. For freezing, wrap individually in plastic—2 months max. The texture actually improves after chilling overnight, so make them the night before serving. To reheat, microwave 10 seconds per bar—just enough to soften the cream cheese layer without melting the chocolate. Double the recipe for gatherings, but use a 9x13-inch pan for even baking.
Why You'll Love This Recipe
- No Mixer Needed: I swear by this recipe when I’m in a rush—just fold the dry ingredients into the wet, spread, and bake. That creamy banana filling? It’s basically mashed banana + softened cream cheese + a splash of vanilla, and it’s foolproof.
- Creamy Crunch Magic: That buttery shortbread crust gives way to the perfect contrast—smooth, tangy cream cheese filling with just enough banana sweetness to balance it. Honestly, the first bite makes me wonder why I ever bought store-bought bars.
- Snack or Dessert: I cut these into squares for after-school snacks, but they’re just as welcome at potlucks or birthday parties. (Pro tip: Dust with powdered sugar right after baking—it’s a game-changer for presentation.)
- Budget-Friendly Indulgence: Flour, sugar, butter, and cream cheese? That’s it. No fancy ingredients, no markup—just pure, satisfying dessert that feeds a crowd for under $10. And the leftovers? They last days in the fridge, wrapped tight.
Step-by-step instructions for banana cream cheese bars
Here's the precise method to create layers of creamy cheesecake crust and swirled banana filling.
Prepare the Cream Cheese Crust
In a food processor, combine the 0.75 cup unsalted butter and 8 oz cream cheese until smooth and creamy. Add the 1 cup granulated sugar and pulse until well blended. With the processor running, gradually add the 1.5 cups all-purpose flour, 1 tsp baking powder, and 0.5 tsp salt until the mixture forms a dough that holds together when pressed.
Transfer the dough to a 9x13-inch baking pan lined with parchment paper. Press firmly and evenly into the bottom, creating an even layer. Use the back of a spoon to smooth the surface and create a clean edge. This foundation is crucial for holding the layers—don't skip pressing it tightly.
Bake the Crust to Golden Perfection
Preheat your oven to 350°F. Bake the crust for 18-20 minutes until the edges are golden brown and the center feels firm to the touch. Remove from the oven and let it cool completely in the pan—this prevents the banana layer from making it soggy. I like to spread a thin layer of 0.5 cup powdered sugar over the cooled crust while it's still warm to create a barrier.
While the crust cools, prepare the banana filling by mashing the 2 cups ripe bananas with 1 tbsp lemon juice until smooth. Stir in 1 tsp vanilla extract and set aside. The acid from the lemon juice helps prevent the bananas from browning and adds brightness to the flavor.
Assemble the Swirled Layers
Spread the banana mixture evenly over the cooled crust, leaving a ¼-inch border around the edges. Using a spatula, gently swirl the banana layer by dragging the spatula through the filling in a circular motion. This creates beautiful marbled patterns that showcase the creamy texture.
Return the assembled pan to the oven and bake for an additional 15-18 minutes at 350°F until the banana layer is set but still slightly jiggly in the center. This ensures a creamy texture rather than a firm one. Watch closely—overbaking will make the filling too dense.
Add Toppings and Finish Baking
Remove the pan from the oven and immediately sprinkle the 0.5 cup mini chocolate chips and 0.25 cup chopped walnuts evenly over the top. Return to the oven for 2-3 minutes just to melt the chocolate slightly and toast the nuts. This final step adds texture contrast and visual appeal.
Let the bars cool completely in the pan before slicing into 16 equal bars. The cooling process allows the layers to set properly, ensuring clean cuts and a perfect balance of textures. Store any leftovers in an airtight container in the refrigerator for up to 5 days or freeze for longer storage.
Pro Tips For Making Banana Cream Cheese Bars
- Mix Cream Cheese Cold: I learned this the hard way—warm cream cheese gets greasy and makes the filling runny. Cut it straight from the fridge, then let it sit at room temp for no more than 20 minutes before mixing. This keeps the texture smooth but stable, so your bars hold together when sliced.
- Bake Until Golden, Not Just Set: The edges will look done at 325°F, but pull them when the center is just set and the top has a golden hue—not pale. Overbaking dries out the banana flavor, and underbaking leaves a gummy middle. A toothpick should come out with one or two moist crumbs, not wet batter.
- Chill the Dough, Not the Pan: Skip the "preheat the pan" step—this isn’t a pancake. Press the dough into a lightly greased 9x13-inch pan (butter works), then refrigerate for at least 30 minutes before baking. Cold dough bakes more evenly, and the cream cheese layer stays creamy instead of separating.
- Use a Scale for Flour: I was skeptical until I tried it—measuring flour by scooping and leveling gives you way too much (hello, dense bars). Weigh it at 120g for the dry mix (or ~1 cup packed). The difference? Lighter, fluffier layers that slice cleanly instead of crumbling. (Yes, even if you’re impatient like me.)
Regional styles of this dish
Southern Comfort Twist
In the South, these bars often get a pecan streusel topping instead of walnuts. Pulse 1 cup chopped pecans with ½ cup brown sugar and 2 tbsp melted butter until crumbly, then sprinkle over the banana layer before the final bake.
Add a pinch of cinnamon to the crust for warmth—it’s a crowd-pleaser at Southern potlucks. 🌰
Midwest Classic
Midwestern bakers often swap the chocolate chips for caramel drizzle. After baking, warm ½ cup caramel sauce (store-bought or homemade) and drizzle it over the bars while still warm.
Top with extra walnuts for crunch. The caramel adds a gooey contrast that’s pure Midwest comfort. I’ve seen this version at state fairs—it’s a hit every time!
Pacific Northwest Adaptation
Out West, they love adding raspberries to the banana layer. Fold ½ cup fresh raspberries (mashed) into the banana mixture before spreading it over the crust. The tartness cuts through the sweetness beautifully.
For extra flair, sprinkle crushed freeze-dried raspberries on top before baking—they add a fun pop of color and texture. 🍓
Tropical Hawaii Version
Hawaiian-style bars incorporate pineapple and coconut. Replace half the banana with 1 cup crushed pineapple (drained) and fold in ¼ cup shredded coconut into the crust.
Top with toasted coconut flakes and a drizzle of toasted coconut syrup after chilling. The tropical flavors transport you to the islands with every bite!
Mid-Atlantic Cheesecake Fusion
In the Mid-Atlantic, these bars often mimic classic cheesecake by adding a graham cracker crust instead of the traditional flour crust. Crush 12 graham crackers with ¼ cup melted butter for the base.
The nutty flavor pairs perfectly with the cream cheese layer, and it’s a nod to the region’s love of cheesecake. Add a sprinkle of crushed graham crackers** on top before serving for extra texture.
Nutrition facts
Frequently asked questions
Can I make these bars without a food processor?
For the crust, cut 0.75 cup cold butter into small cubes and use a pastry cutter or your fingers to work it into the flour mixture until it resembles coarse crumbs. Press the dough firmly into the pan by hand—just be sure to pack it tightly for an even base. The texture will still be delicious, though slightly less refined.
Why did my banana layer turn brown?
The lemon juice in the recipe prevents browning, but if your bananas oxidized, it’s likely from delayed baking or warm temperatures. For extra protection, add ½ tsp vitamin C powder (found in baking sections) to the banana mixture. Also, work quickly when assembling—keep your ingredients chilled until ready to bake.
How do I make these bars gluten-free?
Replace the all-purpose flour with a 1:1 gluten-free flour blend like Bob’s Red Mill or King Arthur. For the crust, add ½ tsp xanthan gum to help bind the mixture. The banana layer remains unchanged. Test your GF flour first—some brands absorb more liquid, so you may need to adjust slightly if the crust feels too dry.
Can I use Greek yogurt instead of cream cheese?
Greek yogurt won’t provide the same rich, creamy texture—cream cheese is essential for that signature tang and melt. However, you could blend ½ cup Greek yogurt with 4 oz cream cheese for a lighter version. The flavor will shift slightly toward tangier, so reduce the lemon juice in the banana layer by ½ tsp to balance it.
What’s the best way to serve these bars?
Slice them into 16 equal bars and serve at room temperature for the best texture. For a restaurant-style presentation, dust with powdered sugar or drizzle with melted chocolate. Pair with vanilla ice cream or a scoop of whipped cream for an extra indulgent treat. They’re perfect for potlucks, holiday desserts, or a quick pick-me-up after dinner!