
Main Courses
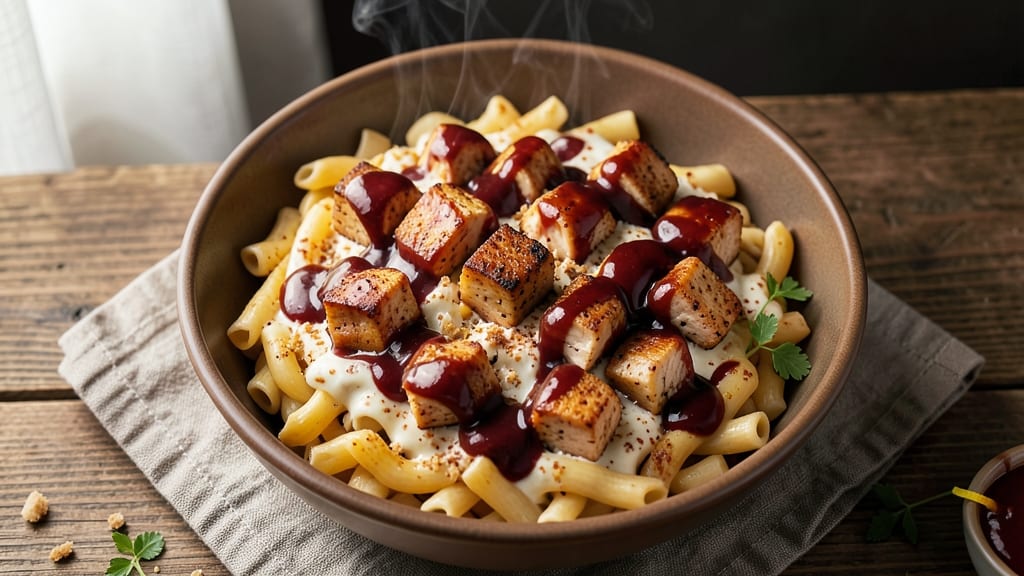
This BBQ chicken mac n cheese recipe combines two crowd-pleasing favorites into one smoky, cheesy, crispy-topped masterpiece that’s impossible to resist.
The secret lies in perfectly seasoned chicken thighs that stay juicy while absorbing bold BBQ flavors, then resting atop a velvety cheese sauce that transforms into a golden, crispy crust when baked.
I developed this after years of experimenting with ways to elevate classic mac and cheese—this version delivers restaurant-quality results with minimal effort.
The magic happens in two phases: first, the chicken marinates in a tangy-sweet BBQ rub while you prepare the foolproof cheese sauce, then everything comes together in a single baking dish.
The pasta absorbs the rich, creamy sauce while the chicken stays tender, and the crispy cheese topping adds that satisfying crunch. This dish is perfect for game day gatherings, family dinners, or when you want to impress with a restaurant-worthy meal that’s actually easier to make at home.
What you’ll end up with is a crispy, golden-brown top that shatters slightly with each bite, revealing layers of melted cheese and smoky-sweet chicken beneath. The sauce clings to every noodle, creating a juicy, satisfying bite that balances rich, creamy, and tangy flavors.
The best part? It’s ready in just 45 minutes, making it ideal for busy weeknights or last-minute entertaining.
Serve with a drizzle of extra BBQ sauce and a sprinkle of green onions for freshness, or add a side of buttery cornbread to soak up every last drop of that creamy, crispy goodness.
This recipe is designed to be foolproof, so even if you’re not a seasoned cook, you’ll achieve restaurant-quality results every time. Let’s get cooking!
Ingredients for bbq chicken mac n cheese
Six ingredients make this smoky-sweet masterpiece—juicy chicken, creamy sauce, crispy cheese top.
| Ingredient | Amount | Notes |
|---|---|---|
| Boneless, Skinless Chicken Thighs 🍗 | 2 lb | Cut into 1-inch pieces |
| Elbow Macaroni 🍝 | 1 ½ lb | Uncooked, medium or jumbo |
| Heavy Cream 🥛 | 1 cup | Full-fat for richness |
| Whole Milk 🥛 | 1 cup | Warmed for smooth sauce |
| Sharp Cheddar Cheese 🧀 | 4 oz | Shredded, aged variety |
| Monterey Jack Cheese 🧀 | 4 oz | Shredded, mild flavor |
| Butter 🧈 | ½ cup | Unsalted, cubed |
| All-Purpose Flour 🌾 | ¼ cup | For roux base |
| BBQ Sauce 🍅 | ½ cup | Smoky-sweet variety |
| Brown Sugar 🍯 | 2 tbsp | Packed, for BBQ rub |
| Smoked Paprika 🌶️ | 1 tbsp | For smoky depth |
| Garlic Powder 🧄 | 1 ½ tsp | Freshly ground preferred |
| Onion Powder 🧅 | 1 ½ tsp | For balanced flavor |
| Salt 🧂 | 1 ½ tsp | Kosher or sea salt |
| Black Pepper 🌶️ | 1 tsp | Freshly cracked |
| Green Onions 🧅 | ¼ cup | Sliced, for garnish |
The chicken thighs are non-negotiable here—bone-in, skin-on stays juicier, but boneless works too. Grab Costco Kirkland Signature or your butcher's best cut for marbling. The BBQ sauce? Sweet Baby Ray's or Stubb's are my go-tos, but any smoky-sweet sauce works. For the cheese, sharp cheddar from a block (pre-shredded gets clumpy) and Monterey Jack for that perfect melt. Pro tip: Toast your flour in the butter for 30 seconds to deepen the roux flavor.
No smoked paprika? Regular paprika plus a pinch of cayenne gets you close. Short on brown sugar? Maple syrup at half the amount works in a pinch. The heavy cream can be swapped for half-and-half if you're watching calories, but trust me on the full-fat version for that velvety texture. For the pasta, jumbo elbows hold up better to the sauce than small shapes. And if you're feeling fancy, add a splash of bourbon to the BBQ rub for extra depth.
This reheats beautifully—honestly tastes better the next day once everything melds. Keeps 4-5 days in the fridge, freezes for 3 months. I portion mine into containers so lunches are sorted for the week. For serving, a drizzle of extra BBQ sauce and those green onions make all the difference. And save the crispy cheese bits—they're the best part!
Why You'll Love This Recipe
- One-Pan Magic: I swear by this—just toss the chicken, macaroni, and sauce in one pot, and let it all meld together. No chopping, no fussing, no extra dishes. The thighs stay juicy while the cheese melts right into the pasta, and honestly? That’s half the battle won before you even taste it.
- Smoky-Creamy Obsession: The BBQ sauce on the chicken isn’t just flavor—it’s the star. That tangy, slightly sweet kick cuts through the richness of the heavy cream and cheddar, giving you layers I can’t stop thinking about. (Yes, even on a Tuesday night.)
- Leftovers That Don’t Suck: Between us, most mac and cheese turns into sad, dry pasta by day three. Not this. The BBQ chicken stays tender, the sauce clings to everything, and reheating it? It’s like it was just made. I’ve packed this for lunches, brought it to potlucks, and even froze half—no texture loss in sight.
- Budget Meal, Big Payoff: Sharp cheddar and chicken thighs stretch this dish further than you’d think. A few thighs feed four, the pasta is cheap, and the BBQ sauce adds depth without breaking the bank. I’ll be real: it’s my go-to when I need a filling, impressive dinner that doesn’t require a grocery haul.
Step-by-step instructions for BBQ chicken mac n cheese
Here's how to create a perfect balance of smoky, crispy chicken and creamy macaroni with that irresistible cheesy top.
Prepare the BBQ Chicken Bites
Cut the 2 lb boneless, skinless chicken thighs into 1-inch pieces—this size ensures even cooking and maximum juiciness. In a bowl, combine the chicken with 0.5 cup BBQ sauce, 2 tbsp packed brown sugar, 1 tbsp smoked paprika, 1.5 tsp garlic powder, 1.5 tsp onion powder, 1.5 tsp salt, and 1 tsp black pepper. Toss until every piece is evenly coated in the smoky-sweet rub.
Heat a large oven-safe skillet over medium-high heat and add the chicken in a single layer. Let it sear undisturbed for 3-4 minutes until golden brown on the bottom, then flip and cook another 3-4 minutes. The chicken should reach an internal temperature of 165°F—this ensures it's juicy, not dry. Transfer the chicken to a plate and tent with foil while you prepare the macaroni.
Cook the Elbow Macaroni Al Dente
Bring a large pot of water to a rolling boil and add 1.5 lb elbow macaroni. Cook until 1 minute shy of the package directions for al dente—you want it to finish cooking in the oven. Drain the pasta, reserving 1 cup of the starchy pasta water, then return the drained macaroni to the pot. This reserved water is your secret weapon for a silky sauce.
While the pasta cooks, reduce the heat under the skillet with chicken to medium-low and add 0.5 cup cubed butter. Let it melt completely, then whisk in 0.25 cup all-purpose flour to create a roux. Cook for 1-2 minutes until the mixture bubbles and thickens slightly—this forms the creamy base for your cheese sauce.
Build the Creamy Cheese Sauce
Gradually pour in 1 cup warmed whole milk and 1 cup heavy cream while whisking constantly to prevent lumps. Let the mixture simmer for 3-4 minutes until it thickens enough to coat the back of a spoon. This is your velvety cheese sauce foundation.
Reduce heat to low and add 4 oz shredded sharp cheddar cheese and 4 oz shredded Monterey Jack cheese, stirring until completely melted and smooth. If the sauce starts to thicken too much, add pasta water 1 tablespoon at a time until it reaches a pourable consistency. The goal is a sauce that clings beautifully to the macaroni without being watery.
Assemble and Create the Crispy Top
Return the cooked chicken to the skillet and stir to coat everything in the creamy cheese sauce. Transfer the entire mixture to a 9x13-inch baking dish, spreading it evenly. For the crispy top, sprinkle the 0.25 cup sliced green onions evenly over the surface, then press down gently to help them adhere.
Bake uncovered at 375°F for 20-25 minutes until the edges are golden brown and bubbly, and the top has formed a crispy, cheesy crust. If the top browns too quickly, tent loosely with foil for the last 5-10 minutes to prevent over-browning while the center finishes cooking.
Rest and Serve for Maximum Creaminess
Remove from the oven and let the mac and cheese rest for 5-10 minutes before serving. This resting period allows the sauce to thicken slightly and redistribute, ensuring every bite is creamy and flavorful. The crispy top will soften just enough to become a delightful contrast to the tender chicken and macaroni.
Garnish with additional sliced green onions if desired, and serve immediately. Each forkful should deliver perfectly balanced textures: tender chicken, creamy macaroni, and that irresistible crispy-cheesy top that makes this dish unforgettable.
Pro Tips For Making Bbq Chicken Mac N Cheese
- Sear Chicken First: Hit those thighs with a dry skillet over medium-high heat until golden—about 3-4 minutes per side—before adding BBQ sauce. I learned this the hard way: skipping the sear means bland, saucy chicken that gets lost in the creamy sauce. The crust locks in flavor and keeps the meat juicy when it’s later shredded.
- Shred at 165°F: Pull chicken when the internal temp hits 165°F, then let it rest 5 minutes before shredding. Overcooking dries it out, and shredding too early means stringy, tough pieces. Use two forks—yes, it’s messy, but it works better than your hands.
- Strain the Cheese: Grate sharp cheddar yourself and press it through a fine-mesh sieve to remove waxy bits. Store-bought pre-shredded cheese has anti-caking agents that make your sauce grainy. Trust me, the effort is worth the velvety texture in every bite.
- Temper the Cream: Warm heavy cream and milk together over low heat until steaming (160°F) before adding to the roux. Cold dairy causes the sauce to seize and clump. I was skeptical until I tried it—now I never skip it.
Regional styles of this dish
Southern BBQ Twist
In the South, this dish gets a smoky kick with hot honey drizzled over the crispy top. I like to mix 2 tbsp hot honey with 1 tbsp apple cider vinegar and brush it on just before serving—it cuts through the richness while adding a subtle heat.
For extra Southern flair, add crumbled bacon (about ½ cup cooked) to the cheese sauce for a salty, smoky depth. 🌶️
Texas-Style Smoky Crust
Texans take their mac and cheese seriously, so they often top this dish with a crispy buttermilk biscuit crust. Make a quick biscuit dough with 1 cup biscuit mix, ½ cup buttermilk, and 2 tbsp melted butter, then press it over the top before baking.
For a shortcut, use store-bought biscuit dough and bake it alongside the mac and cheese for 10-12 minutes at the end. The result? A flaky, buttery contrast that’s pure comfort food. 🥓
Carolina BBQ Sauce Swap
In the Carolinas, they love a vinegar-based BBQ sauce for their chicken. Swap the sweet BBQ sauce for ½ cup vinegar-based Carolina-style sauce (like Sweet Baby Ray’s Carolina Gold) and add 1 tsp cayenne pepper to the chicken rub for a tangy, spicy kick.
Serve with pickled jalapeños on the side for those who want extra heat. The sharpness balances the creamy mac and cheese beautifully. 🌶️
Midwest Crispy Cornbread Top
The Midwest loves adding cornbread to their mac and cheese for a sweet-savory twist. Mix 1 cup cornmeal, 1 cup flour, 1 tbsp baking powder, ½ tsp salt, 1 egg, 1 cup buttermilk, and 2 tbsp melted butter into a batter.
Spread it over the top of the mac and cheese and bake for 15-20 minutes at 375°F until golden. The crumbly texture adds a fun contrast to the creamy sauce. 🌽
New England Cheese Upgrade
Up North, they take their cheese seriously—swap the cheddar and Monterey Jack for 4 oz sharp cheddar, 4 oz Gouda, and 2 oz Gruyère for a nutty, complex flavor.
Add ½ cup white wine to the cheese sauce for depth, and finish with toasted breadcrumbs (mix ½ cup panko with 2 tbsp melted butter) for a crispy, golden top. The wine adds a sophisticated touch that pairs perfectly with the smoky chicken. 🧀
California Avocado Twist
For a lighter, fresher take, add ½ avocado blended into the cheese sauce for creaminess (skip the heavy cream). Top with sliced avocado and crumbled cotija cheese before baking, then finish with cilantro and lime wedges.
The bright, citrusy flavors cut through the richness, making this a perfect dish for warm weather. 🥑
Nutrition facts
Frequently asked questions
Can I use chicken breasts instead of thighs for this recipe?
Chicken breasts will work, but thighs are ideal because they stay juicier and absorb more flavor. If using breasts, cut them into ½-inch thick pieces and marinate for at least 30 minutes to prevent dryness. Cook them to 165°F internal temp—don't overcook! For extra moisture, add 1 tbsp BBQ sauce to the baking dish before serving.
How do I make this dish ahead of time?
Assemble everything up to the baking step, then refrigerate uncovered for up to 24 hours before baking. When ready, bake at 375°F for 30-35 minutes (5-10 minutes longer than fresh) until bubbly. For freezing, bake completely, cool, then store in airtight containers for 3 months. Reheat covered at 350°F for 20-25 minutes—the crispy top will soften slightly but still taste amazing.
Why did my cheese sauce get grainy?
Grainy texture usually means the cheese didn't melt completely or the sauce was too thick. Always use freshly shredded cheese (pre-shredded has anti-caking agents that prevent melting). For extra smoothness, whisk in 1 tbsp lemon juice or white wine while melting the cheese. If it's still grainy, blend the sauce briefly with an immersion blender—just don't over-blend or it'll get gluey.
Can I make this in a slow cooker?
Yes! Cook the chicken separately (grill or pan-sear to 165°F), then combine with the cheese sauce and macaroni in a 5-6 quart slow cooker on low for 1-2 hours until heated through. For the crispy top, transfer to a baking dish and broil for 3-5 minutes at the end. The slow cooker keeps everything creamy, but you'll lose that signature crispy crust—save that for the broiler step.
What's the best way to reheat leftovers?
For best results, cover the dish with foil and reheat at 350°F for 15-20 minutes until warmed through. To restore crispiness, broil for 1-2 minutes at the end. Microwave reheating works in a pinch (cover with a damp paper towel, 30-second intervals on medium), but it'll make the top soggy. Leftovers actually taste better the next day as flavors meld!